For the previous posts in this series click Part 1, Part 2, Part 3, Part 4, Part 5, Part 6a, and Part 6b.This post contains affiliate links. If you make a qualifying purchase after clicking a link, we may receive a percentage of the purchase price.
I am still working on the post re: accounting for your time, so decided to add an extra post here on making your own food. The post on accounting for time, should be out tomorrow — as long as my eyes return to normal quickly after getting dilated this afternoon as part of a routine annual appointment. If they don’t I won’t be able to see the screen to type and the post on accounting for your time will be shoved off one more day.
When I was growing up, we rarely ate out. My mother prepared all the meals that we ate. Some of our meals were simple — packaged breakfast cereal and milk, sandwiches for lunch — but my mom made a hot dinner for us every day.
I started learning to cook when I was 11 or 12. We moved from Connecticut to Massachusetts and my mother went from working part-time in the evenings to full-time during the day. At first, when I started helping with food, my mom would prepare a roast or something for dinner and leave it in the refrigerator. I would put it into the oven so that it would be ready to eat at our regular dinner time. Eventually, I learned to help prepare components of meals or entire meals.
By the time I was a newlywed, I had some basic cooking skills, but still had a lot to learn. I grew up in a vegetarian household and all of the cooking I’d done was vegetarian. My new husband was not a vegetarian and wanted to eat meat at home. I clearly remember the first November of our marriage when his boss gave him a turkey as a holiday bonus. I had never made a turkey and did not know where to start. I also remember how grossed out I was to touch that thing — I wore medical gloves when rinsing the turkey and removing the gizzards from the cavity because I did not want to touch it!
Like my mother, I focused primarily on dinner, once all the food preparations were my responsibility. The Tightwad Gazette by Amy Dacyczyn (Amazon affiliate link) opened my eyes to other options and taught me to think critically about every packaged food I purchased. I started to ask myself, “Can I make this?” and found that the answer was often, not just ‘yes,’ but quickly and at a great savings. Even if you cook all the time, perhaps you haven’t considered some of the categories below. If you have not cooked before, think about trying some of these items. You don’t have to start with making a big meal!
Snacks
This is a huge and varied category. It might mean cookies — I make so many chocolate chip cookies that I have the recipe memorized and the time from Chris’ request for cookies to hot out of the oven is no more than 25 minutes. It might mean carrot sticks. I used to buy baby carrots, until I learned that they are full-sized carrots milled to size (external link to Washington Post article). Cutting carrot sticks is not that hard and does not take much time. I cut enough carrot sticks for four or five servings and keep them in containers in the produce drawer so we can grab them whenever we like. The bottom line here is that many snacks are easy to prepare, far less expensive to prepare than to buy, and a fun way to learn cooking techniques!
Condiments
Mayonnaise is quick, easy, and inexpensive to make. Two egg yolks, a cup of oil, a little vinegar or lemon juice, and some seasonings makes about 1.5 cups of mayonnaise. This takes maybe 5 minutes if you use a blender rather than whisking by hand. Homemade will cost roughly $1.30, depending on which type of oil you use and the price of lemon juice. The same amount of store bought costs $2.50 – $3.70, depending on brand.
Vinaigrettes are incredibly easy to make. The classic ratio is 3 parts oil to 1 part acid (vinegar or lemon juice); use that as a starting point, but recognize that this is a rule that can be broken (external link to Bon Appetit article). That means 1 cup of vinaigrette is 3/4 cup oil and 1/4 cup. Add salt, herbs, and other additions (chopped vegetables). Play around with different oil-acid combinations and different additions. See what you like!
Another reason to look at making your own condiments is so you can make something to meet your dietary restrictions. For example, I love Thai food but almost all Thai dishes use fish sauce, made from fermented fish, rather than salt for seasoning. I can make vegan fish sauce (external link to Vermilion Roots blog) to use in homemade Pad Thai or Thai curry.
Not all condiments are easy to make. Ketchup, for example, can be made at home, but takes a long time. It might be worth it if you make a big batch at once and can it, but this is probably not where you want to start on your quest to save money or learn how to cook.
Look at all the condiments you have in your house and do a little research on how to make them. You may be surprised to find that things you are spending a lot of money on are easy to make and the homemade versions cost pennies compared to the store-bought ones you’ve been using.
Spice Blends
There’s almost no reason to buy a spice blend ever. Maybe if you are trying a new cuisine and aren’t sure that you are going to like it. Pick a cuisine and do a little research on it and you’ll find that it is built on a relatively small range of flavor profiles, usually based on the spices, herbs, and vegetables that were local to that area 400 – 500 years ago. In the years since then, spices and herbs have been traded across the globe and cuisines now include overlapping ingredients. Learn what spices and herbs make up the flavor profiles in the cuisines you like best. Stock the individual spices and herbs and make your own spice blends as needed.
Conclusion
The categories listed here are meant to give you a starting point. If you want to save the most money, you eventually need to look critically at everything you buy that is already prepared. Any food that is made commercially can also be made at home, given the right combination of time, tools, and ingredients. It is possible to can tomatoes, cook dried beans instead of buying canned, make bread, pasta (see, for example, the Pasta Grannies YouTube Channel), jam and every other food under the sun. People made their own food for millennia. Our current era of widely available, pre-packaged foods is maybe 75 years old (post-World War II) and its roots only go back to the Iate-19th and early-20th century. The trick in our time is figuring out which foods can be made inexpensively, quickly, and deliciously. Start with what is easy for you and grow from there.
For the previous posts in this series click Part 1, Part 2, Part 3, Part 4, Part 5 and Part 6a.This post contains affiliate links. If you make a qualifying purchase after clicking a link, we may receive a percentage of the purchase price.
Yesterday, we talked about calculating the cost of ingredients and setting up a spreadsheet. Today, it’s time to put a recipe into the spreadsheet so we can figure out how much it cost, then compare that cost to the store bought product it is meant to replace.
About the Recipes
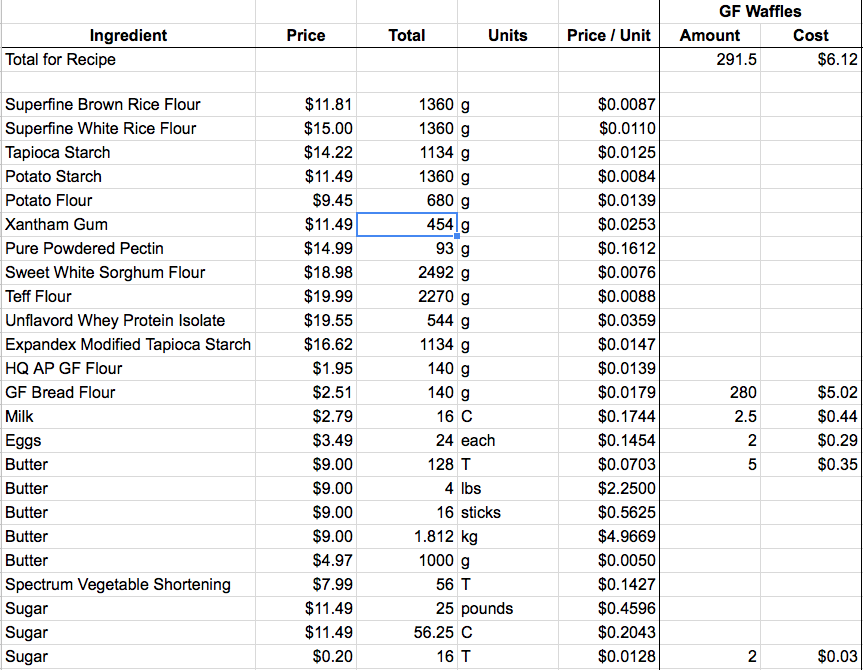
The recipe I’m using for comparison is Yeast-Raised Waffles from the book Gluten-Free on a Shoestring Bakes Bread by Nicole Hunn (Amazon affiliate link). This particular recipe is not available on the Gluten-Free on a Shoestring blog. The spreadsheet screenshots in this post do not include two of the ingredients in the recipe — yeast and salt. I purchase those ingredients very infrequently and in bulk at Costco. At the quantities in this recipe, the two together add less than $0.05, so omitting them on the spreadsheet does not appreciably impact the overall analysis.
Nicole Hunn developed her own gluten-free flour blends and all of her other recipes use one of her own blends. The recipes for the blends are available on her blog. The ingredients and quantities included on the spreadsheet for the two flour blends are the complete list.
Add a Recipe
Once the ingredients are in the spreadsheet, adding a recipe is pretty quick. You need two columns for the recipe. The column labeled ‘Amount’ is the quantity of the particular ingredient in the recipe. The column labeled ‘Cost’ is a formula.
Amount
This column is a manually entered static number. I open up the recipe book and go down the list, adding the quantity of ingredients. When you have ingredients with multiple entries (both butter and sugar in the waffle recipe), make sure you are entering the quantity on the line that matches the units in this particular recipe.
Price
The formula contains two cell addresses, multiplied together. The first cell reference is to the Price / Unit cell for that row. The second cell reference is the Amount cell for that row. (Price / Unit) * Amount. For sugar, the actual entry in the Cost cell is: =E28*R28. E28 is the cost of 1 tablespoon of sugar. R28 is the number of tablespoons of sugar (2) in this recipe.
Total Per Recipe
Finally, we need to calculate the total cost of the recipe. You can see that I put this information at the top of the column instead the bottom of the column. I did that because the spreadsheet will eventually have a long list of ingredients and I didn’t want to have to scroll all the way to the bottom to see the Total.
The formula in the Cost column is a sum of the column. The entry is =Sum(S5:S300). The reason I went all the way down 300 rows is because I don’t know how many ingredients will end up being in the spreadsheet and when I reorganize into alphabetical order, I don’t know how far down the ingredients in this recipe will be. I don’t want to break my formulas if I don’t have to, so I put in a number that it is much higher than the number of ingredients I expect will be listed in this spreadsheet.
I’ve calculated the total for both the Amount column and the Cost column. There’s really no reason for that and the number in the Amount column is not useful because ingredients are measured with two different measuring systems (butter and sugar by volume and everything else by metric weight).
Compare Your Recipe Cost to the Cost of Prepared Food
In order to make the financial comparison, you must make an honest comparison with the food the homemade version is meant to replace. If you might buy any of several different brands, you should compare your homemade version to the lowest cost prepared food you would otherwise buy. The trickiest part of the homemade to prepared food comparison is making sure you compare equal quantities of the foods, whether that is serving sizes or weight.
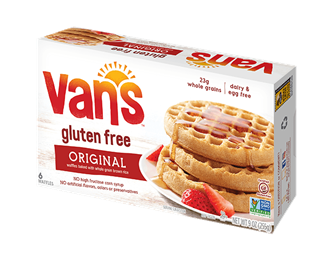
In the case of the gluten-free waffles I’m using for illustration purposes, our comparison product is Vans Original Gluten-Free Waffles (not an affiliate link. This link to Van’s website is provided because they have the nutritional label and that may be useful for comparison purposes as you read).
When Chris decided to reduce the amount of gluten he was eating, waffles was his first major concern. He loves waffles with eggs and bacon for breakfast and, often, for dinner. He tried a couple different brands and Vans were his favorite, so that is what we have been buying. We can get them at either Publix or Whole Foods and the price is the same in both places: $5.50 per box of 6 waffles. He eats one waffle per meal.
It cost $6.12 to make the Gluten-Free Waffle recipe. At first glance, it looks like the Vans are less expensive than homemade, but is that true? In order to know for sure, we have to look at how many servings the homemade recipe makes.
This is what one waffle looks like, just out of our waffle maker. The Gluten Free Waffle recipe made 7 full waffles plus 3 additional hearts. After I make waffles, I break up the big waffles into individual hearts. I line a cookie sheet with wax paper and put the hearts onto the sheet. I usually need multiple layers and I separate them with more wax paper. I then put the entire cookie sheet into the freezer.
When the waffles are frozen, I take the cookie sheet out of the freezer and transfer the waffles to a gallon-size Ziploc bag, which I label with the date I made the waffles. The reason I freeze them in this fashion is because the individual hearts do not stick together in the Ziploc bag if you put them in there already frozen. You can take out as many as you want to eat and pop them into the toaster oven to reheat them.
Since this was the first time I made this particular recipe, I weighed one of the big waffles and compared it to the box of Vans. The 7 big waffles were the equivalent of 15 individual Vans waffles, so 2.5 boxes worth. That means that, by weight of products it would cost $13.75 to buy the same amount of waffles that I made for $6.12.
I’m not sure weight is the best comparison in this instance, however. By weight, it takes 2.5 homemade heart waffles to equal 1 Vans waffle. We all know Chris is not going to eat 2.5 heart waffles at a time. He’s going to eat 2 or he’s going to eat 3. The recipe made a total of 38 hearts (7 big waffles * 5 hearts per big waffle + 3 extras). That works out to 13 servings or 2 boxes plus one Vans waffles. By likely serving size, we would pay $11.92 to buy the same amount of waffles that I made for $6.12.
In this case, it is clear that no matter how I measure, making the waffles is less expensive than purchasing the Vans waffles. Of course, our goal isn’t just the lowest cost. It is food that (1) tastes good and (2) promotes health (3) at the lowest possible cost, with an eye to the (4) time it takes to procure, prepare, and clean-up our food. Therefore, I think it’s important to note that Chris liked the taste of the homemade waffles at least as well, if not better, than the Vans!
Up Next
In this series so far, I’ve presented several tools and strategies that I learned when I was a young newlywed with little money to spend on anything. All of these strategies can save us money, but using them requires another precious resource: Time. How do we account for the time it takes to use these various strategies? Does the time involved mean there’s no point to using these strategies? Tomorrow, I’m finally going to write about time and introduce you to another resource that I first encountered at the same time that I found The Tightwad Gazette (Amazon affiliate link).
For the previous posts in this series click Part 1, Part 2, Part 3, Part 4, and Part 5.This post contains affiliate links. If you make a qualifying purchase after clicking a link, we may receive a percentage of the purchase price.
When I was growing up, one underlying assumption of saving money on groceries is that it was less expensive to make food yourself than it was to buy processed foods. Frugal writers often issue the imperative that to save money you must make your own, without offering any justification for this statement. It’s the kind of wisdom that seems like it must be true, so let’s just all agree that it is. It’s also the kind of wisdom that must be examined, if our goal is to choose the lowest cost option.
There are three factors to creating your own foods: cost of ingredients, cost of electricity or gas for your cooking appliances, and the cost of time. The Complete Tightwad Gazette by Amy Dacyczyn (Amazon affiliate link), gave me the tools for calculating the first two of these costs. I am not going to discuss the cost of running appliances in this series.
Today’s post is about accounting for the cost of ingredients. In tomorrow’s post, I’ll discuss how to use the cost of ingredients to calculate the cost of a recipe and compare that to similar prepared foods. Monday’s post is about factoring your time into all of the strategies discussed in this series. Tuesday’s post will wrap up this series by discussing some of the strategies I’ve developed through using these tools.
Calculating Your Cost Per Recipe
If you’ve been reading this series, you’ve probably figured out by now that I love math. If you’ve known me a while, or if you’ve read my other blog, especially the post on Crafting CPH (Cost Per Hour), you long ago figured out that I love math. Either way, by now you know enough about me to know that when I came across Amy Dacyczyn’s article on Calculating C.P.M. (Cost Per Muffin), I was immediately hooked and happy as a math geek with a page full of numbers gets.
Calculating the cost of a recipe is a straightforward process. Figure out how much a unit of each ingredient costs, multiply the amount of the ingredient used in the recipe by the unit cost of the ingredient, add up the cost of all the ingredients used in the recipe, and divide that cost by the number of servings the recipe produces. Compare the cost of a homemade serving to the cost of an already prepared serving. In this endeavor, your time spent calculating can be minimal because a spreadsheet is your friend.
Calculate Unit Cost
Q: If we’ve been diligently following the steps laid out in this series of columns, haven’t we already done this?
A: Maybe. Probably not.
What is a unit?
The issue here comes down to the question we asked ourselves before: What is a unit? When you are shopping the quickest way to make comparisons between different brands of raw ingredients is usually the weight of the package, so your units will be in ounces or grams. When you are cooking, you can measure the ingredients by volume, Imperial weight (ounces and pounds), or metric weight (grams and kilos).
If you are like the majority of people in the United States, you use volume to measure your ingredients when cooking or baking and recipes, whether in books or online, intended for distribution in the United States rarely include anything other than a volume measurement. Outside the United States, it is more likely that recipes are measured in metric weight.
I personally use volume for cooking. Sometimes that means with a measuring cup and sometimes it means eyeballing it. When I’m baking, however, I use metric weight to measure ingredients. (I’ll save the detour on why for a future post).
Some ingredients might be measured in various ways, depending on the recipe. For example, if I’m making a white sauce, I measure butter by the tablespoon. If I’m making a cake, I weigh the butter in grams.
Equivalencies
If you need to find a volume measurement, look at the nutrition and serving size label on your product. On most products, the serving size is a volume measurement. Unfortunately, that volume measurement may not use the same units as your recipe and you will have to figure out how the two relate to each other.
If you have a smart phone, there are apps for this. But here’s some equivalents for you anyway:
Volume
1 Tablespoon = 3 teaspoons
1 Cup = 16 Tablespoons = 8 fluid ounces
1 Pint = 2 Cups
1 Quart = 4 Cups
1 Gallon = 4 Quarts = 16 Gallons
1 Fluid Ounce = 29.5735 milliliters
1 Liter = 1000 milliliters
Weight
1 Pound = 16 Ounces
4 Ounces = 112 grams
1 Kilo = 1000 grams =2.2 pounds
The Basic Formula
To calculate the cost of ingredient, divide the price by the number of units. Some ingredients may only require a single calculation because you only measure them in one way. If you measure an ingredient in different units, depending on the recipe, you will need to make a calculation for each form of measurement. I might measure sugar by the cup, tablespoon, teaspoon, pound, ounce, kilogram, or gram, depending on the recipe. Each of these different measurements is the same calculation: price paid for the package divided by the number of units of that size in the package.
A Spreadsheet is Your Friend
I recently started a spreadsheet to calculate the cost of making gluten free items. The remainder of this blog post is the technical documentation explaining how I set up that spreadsheet, so you can use that information to set up a spreadsheet also. It is a little bit of work to set up the spreadsheet, but once it is set up in the way described here, maintenance is easy!
The recipes included on this spreadsheet all come from the Gluten Free on a Shoestring blog. The author of that blog developed her own gluten free flour recipes and uses that flour as the basis for all of her other recipes. The first six recipe columns of my spreadsheet calculate the cost of the various flour blends. The flour blends are also listed as ingredients since they will be used in making other recipes.
This spreadsheet does not yet reflect an accurate total for either the waffles or the chocolate chip cookies included on the sheet. Since this is a new spreadsheet, since I had not been carefully tracking the price of various ingredients, and since I used pantry ingredients like brown sugar, which were purchased some time ago at an unknown cost, those ingredients are not yet on the sheet. Next time I buy those ingredients I will update the spreadsheet with that information.
Enter Your Ingredients
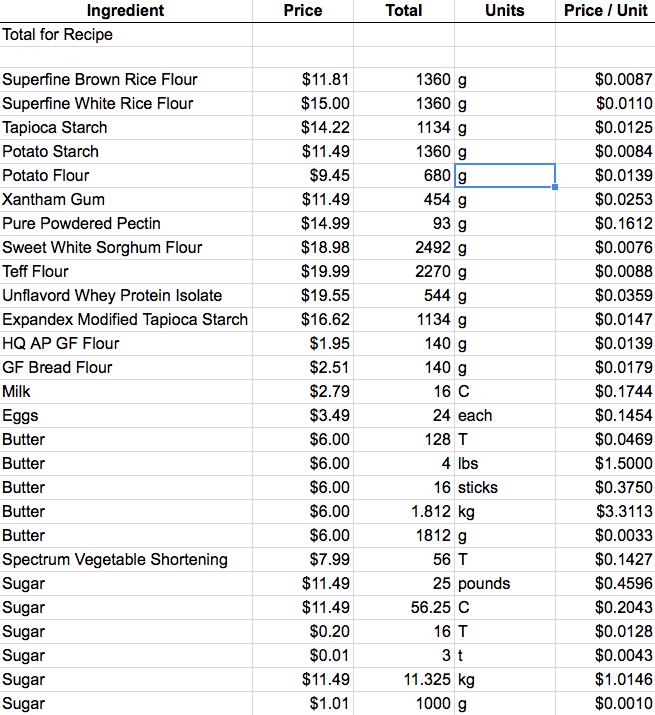
This is all the ingredients I’ve entered into my spreadsheet so far. I manually enter the information in the columns labeled Ingredient and Units. For the Price and Total columns, I manually entered the number, but many of these entries are cell references or formulas rather than static numbers. The Price / Unit column is a formula.
Ingredient Column
I entered ingredients while looking at recipes and have not sorted them in any fashion. Eventually, I will sort them in alphabetical order. As I’m looking at this now, I realize that I’m probably going to want to change the names so that an alphabetical sort makes sense.
When the spreadsheet only has a handful of ingredients, the name I use isn’t a big deal. If I have 100 or more entries, I don’t want to be able to find a particular entry quickly. For example, if I sort alphabetically right now, Superfine Brown Rice Flour is going to be in S. I’m not going to look for it there. I’m going to want to change it to Flour, Superfine Brown Rice or Flour, Rice, Brown, Superfine or some variation thereof. The important thing is that it’s first and foremost Flour, so that should be the first word!
Price, Total, and Units Columns
The price is the actual amount you paid for the product. The Total is the number of units in the product. The Units is the name of the units used.
Every formula is only as accurate as the data it uses. If our price or total entries are incorrect, the Price / Unit generated by the spreadsheet is just a random number. Therefore, we have to think carefully about how to make entries in the Price and Total Columns.
On my spreadsheet, the information in the Price and Total Columns is a combination of manual entries, cell references, and formulas. In this section, I’ll describe the options and when to use each one.
A Single Entry
If the ingredient only needs one entry, all you need to do is pick the relevant level of units and manually fill in the information across the row. Your Total Units can either be the weight of the product, as it is for every ingredient currently on my spreadsheet, or it can be a volume measurement obtained from the serving size label on the product.
Whether you use a volume or weight measurement, your single entry should be something that makes sense for the way you use the product. If the serving size on the label does not make sense for the way you use the product, your units may be a formula.
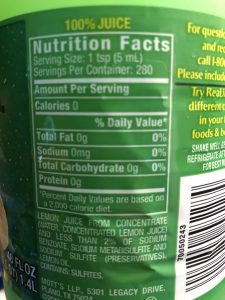
For example, this bottle of lemon juice uses 1 teaspoon as a serving size and has 280 teaspoons per bottle.
If I will only ever use the lemon juice 1 Tablespoon at a time, I can put the formula =280 / 3 (total teaspoons in bottle divided by 3 teaspoons in one tablespoon) into the Total column and never think about it again — unless I buy a bottle with a different number of teaspoons.
Multiple Entries
If you need multiple entries for a single ingredient because you may measure it in different ways when cooking, that’s when things get more complicated.
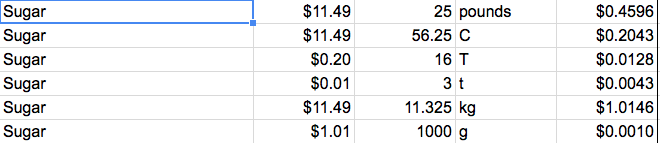
When I need multiple entries, the first entry I make for that ingredient is exactly as I purchased it. For example, the first entry here for sugar is $11.49 for a 25 pound sack. I bought this sugar at Costco and this entry reflects exactly the size of that single bag of sugar. All of the other entries include at least one cell reference or formula in the Price or Total column.
The reason I set my sheet up this way is because I want the ongoing maintenance of this system to be easy. I do not mind taking some time to set it up, but I do not want to manually calculate or enter 6 different values for sugar every time I buy a new bag.
The combination of manual entry, cell references, and formulas in the spreadsheet is calibrated so that if I buy another 25 pound bag, all I need to do is change the price on the $11.49 / 25 pound line. All of the remaining entries for sugar will update automatically. If I buy a 10 pound bag of sugar rather than a 25 pound bag of sugar, all I need to do is enter the new price and weight on the $11.49 / 25 pound line and all of the remaining entries for sugar will update automatically.
In order to get the correct combination of manual entry, cell references, and formulas for a particular ingredient, it matters if you start from a larger unit and work down (the sugar example) or if you start from a smaller unit and work up (the lemon juice example). Let’s look at how to do the formulas in each instance.
Starting with Larger Units
When starting with Larger Units, your Price column will always contain a cell reference, either to the Price cell of the first entry or to the Price / Unit cell of the next largest relevant measurement. The Total column will either be a formula or a static number, entered manually. If the Total column includes a formula, that formula will include a cell reference to the Total cell of the first entry.
I want price / unit for all three measurement options — volume, Imperial weight, and metric weight — because sugar is a product that I might use in a variety recipes with differing measurement systems. Therefore, my first equations are the ones needed to convert between the different measurement systems. Once I have a starting point for each measurement system, my next set of equations provide the price for the smaller measurements within that system.
If I wanted to go straight from $11.49 / 25 pounds of the sugar package as purchased to a price / teaspoon, one way or another, I have to do the following steps:
Calculate the price per pound ($11.49 / 25)
Calculate the price per cup ($11.49 / 25 * 2.25)
Calculate the price per tablespoon ($11.49 / 25 * 2.25 / 16)
Calculate the price per teaspoon ($11.49 / 25 * 2.25 / 16 / 3)
Clearly, this is an iterative process. I manually enter numbers when they are encountered for the first time. After that, I use cell references to refer to the already completed calculations. For the pounds to teaspoons calculations, that looks like this:
Calculate the price per pound: Manually enter $11.49 in Price column and 25 in Total column
Calculate the price per cup: This is a conversion row because I am switching from one measurement system to another. In conversion rows, the Price cell is a reference to the price cell of the first entry (=B26) because the price of the entire package is the same, regardless of how you measure it! When I manually update the price in the first row, the cell reference means this cell will automatically update.
In conversion rows, the Total entry is a formula that references the measurement of the first entry. I might buy 5, 10, or 25 pound bags of sugar based on what the unit pricing in the store tells me is a better deal. By referring back to Totals column in the first entry rather than using a static number, I can change only the first entry and all the other cells will update accordingly.
To convert from weight to volume, you can either look at the serving sizes, look up your product on the internet, or measure 1 cup of the product and weigh it. A quick Google search tells me that 1 pound of sugar = 2.25 cups. The full equation for the Total cell for the Cups row is: =C26 * 2.25.
Calculate the price per tablespoon. Now I am reducing from one measurement to another in the same measurement system. I know there are 16 tablespoons in 1 cup, so to find the price per tablespoon, I need to divide the price per cup by 16. The Price entry is a cell address for the Price / Unit in the Cups row (=E27). The Totals entry is a manually entered static number: 16 (tablespoons per cup).
Calculate the price per teaspoon. Again, I am reducing from one measurement to another in the same measurement system. I know there are 3 teaspoons in one tablespoon. To find the price per teaspoon, I need to divide the price per tablespoon by 3. The Price entry is the cell address for the Price / Unit in the tablespoons row (=E28). The Totals entry is a manually entered static number: 3 (teaspoons per tablespoon).
The process for getting prices for metric system measurements is the same.
Calculate the price per pound ($11.49 / 25)
Calculate the price per kilogram ($11.49 / 25 / 2.2)
Calculate the price per gram ($11.49 / 25 / 2.2 / 1000)
Calculate the price per kilogram. This is a conversion row. Therefore, the Price cell is a reference to the price cell of the first entry (=B26). We are converting between two different systems for measuring weight and we already know the conversion factor is 2.2 pounds to a kilogram. The formula for the Totals column is: =C26 / 2.2
Calculate the price per gram. Now we are reducing from one measurement to another in the same measurement. We know there are 1000 grams in a kilogram, so to find the price per gram, I need to divide the price per kilogram by 1000. The Price entry is the cell address for the Price / Unit in the kilograms row (=E30). The Totals entry is a manually entered static number: 1000 (grams per kilogram).
Starting with Smaller Units
If we start with smaller units, we are going in reverse order, and this changes where we need to manually enter static numbers, cell references, and formulas. Let’s use the bottle of lemon juice as an example. I do not remember how much I paid for the bottle, but let’s just say it was $2.00.
The series of calculations we need to do is as follows:
Calculate the Price per teaspoon ($2.00 / 280)
Calculate the Price per tablespoon ($2.00 / 280 * 3)
Calculate the Price per Cup ($2.00 / 280 * 3 * 16)
We have two different options for Price and Total entries when working from the smallest units up to larger units. In option 1, we use a formula in the price column and manually enter the static number 1 in the Total column.
Calculate the price per teaspoon. This is our first entry, so we manually enter $2.00 in the Price column and $2.93 in the Totals column.
Calculate the price per tablespoon. The Price is a formula in which we multiply the price per teaspoon by the number of teaspoons in a tablespoon. We use a cell address reference for the price per teaspoon, which we calculated in the preceding row. In this case, our formula is: =E34 * 3. Since our Price formula reflects the conversion from teaspoons to tablespoons, we manually enter a static 1 in the Totals cell.
Calculate the price per cup. The Price is a formula in which we multiply the price per tablespoon by the number of tablespoons in a cup. We use a cell address reference for the price per tablespoon, which we calculated in the preceding row. In this case, our formula is: =E35 * 3. Since our Price formula reflects the conversion from tablespoons to cups, we manually enter a static 1 in the Totals cell.
In option 2, we use a cell reference in the Price column. That cell reference refers back to the Price / Unit for the next smallest unit. In the Totals cell, we enter a static number reflecting the number of smaller units in the larger unit.
Conversions between measuring systems can be handled three ways when starting from the smallest units and working your way up. (1) You can convert to smallest units across all measuring systems and work your way up in all of them. (2) You can work your way up in your first measuring system, use the largest units to convert to the other measuring systems and work your way down from there. (3) You can use packaging information to getting starting points for each of the measuring systems (the front of the bottle of lemon juice tells me the number of fluid ounces and liters in the bottle) and manually enter a starting point for each. If you choose the third option, you would have to make manual adjustments to the starting point in each measuring system, if you purchase a different size of that product in the future.
Price / Unit
The Price / Unit column is a formula. If you start from the larger units and work your way down or you used option 1 when working from the smallest units on up, the formula is the number in the Price column divided by the number in the Total column.
If you started from the smallest units and worked up and you choose option 2, the formula in the Price column is the number in the Price column multiplied by the number in the Total column.
I personally prefer to use option 1 when working from the smallest units on up because I like to have the Price / Unit formula stay the same for every cell in that column. In the Price and Totals column, my formulas are never going to be consistent because ingredients have a variety of units.
Conclusion
Now that we have ingredients entered and we know how much they cost us using various units of measurements, it is time calculate how much a particular recipe costs to make and compare that to the prepared products available in the grocery store. Time to add some columns to the spreadsheet!