For the previous posts in this series click Part 1, Part 2, Part 3, Part 4, Part 5, Part 6a, Part 6b, and Part 6c.This post contains affiliate links. If you make a qualifying purchase after clicking a link, we may receive a percentage of the purchase price.
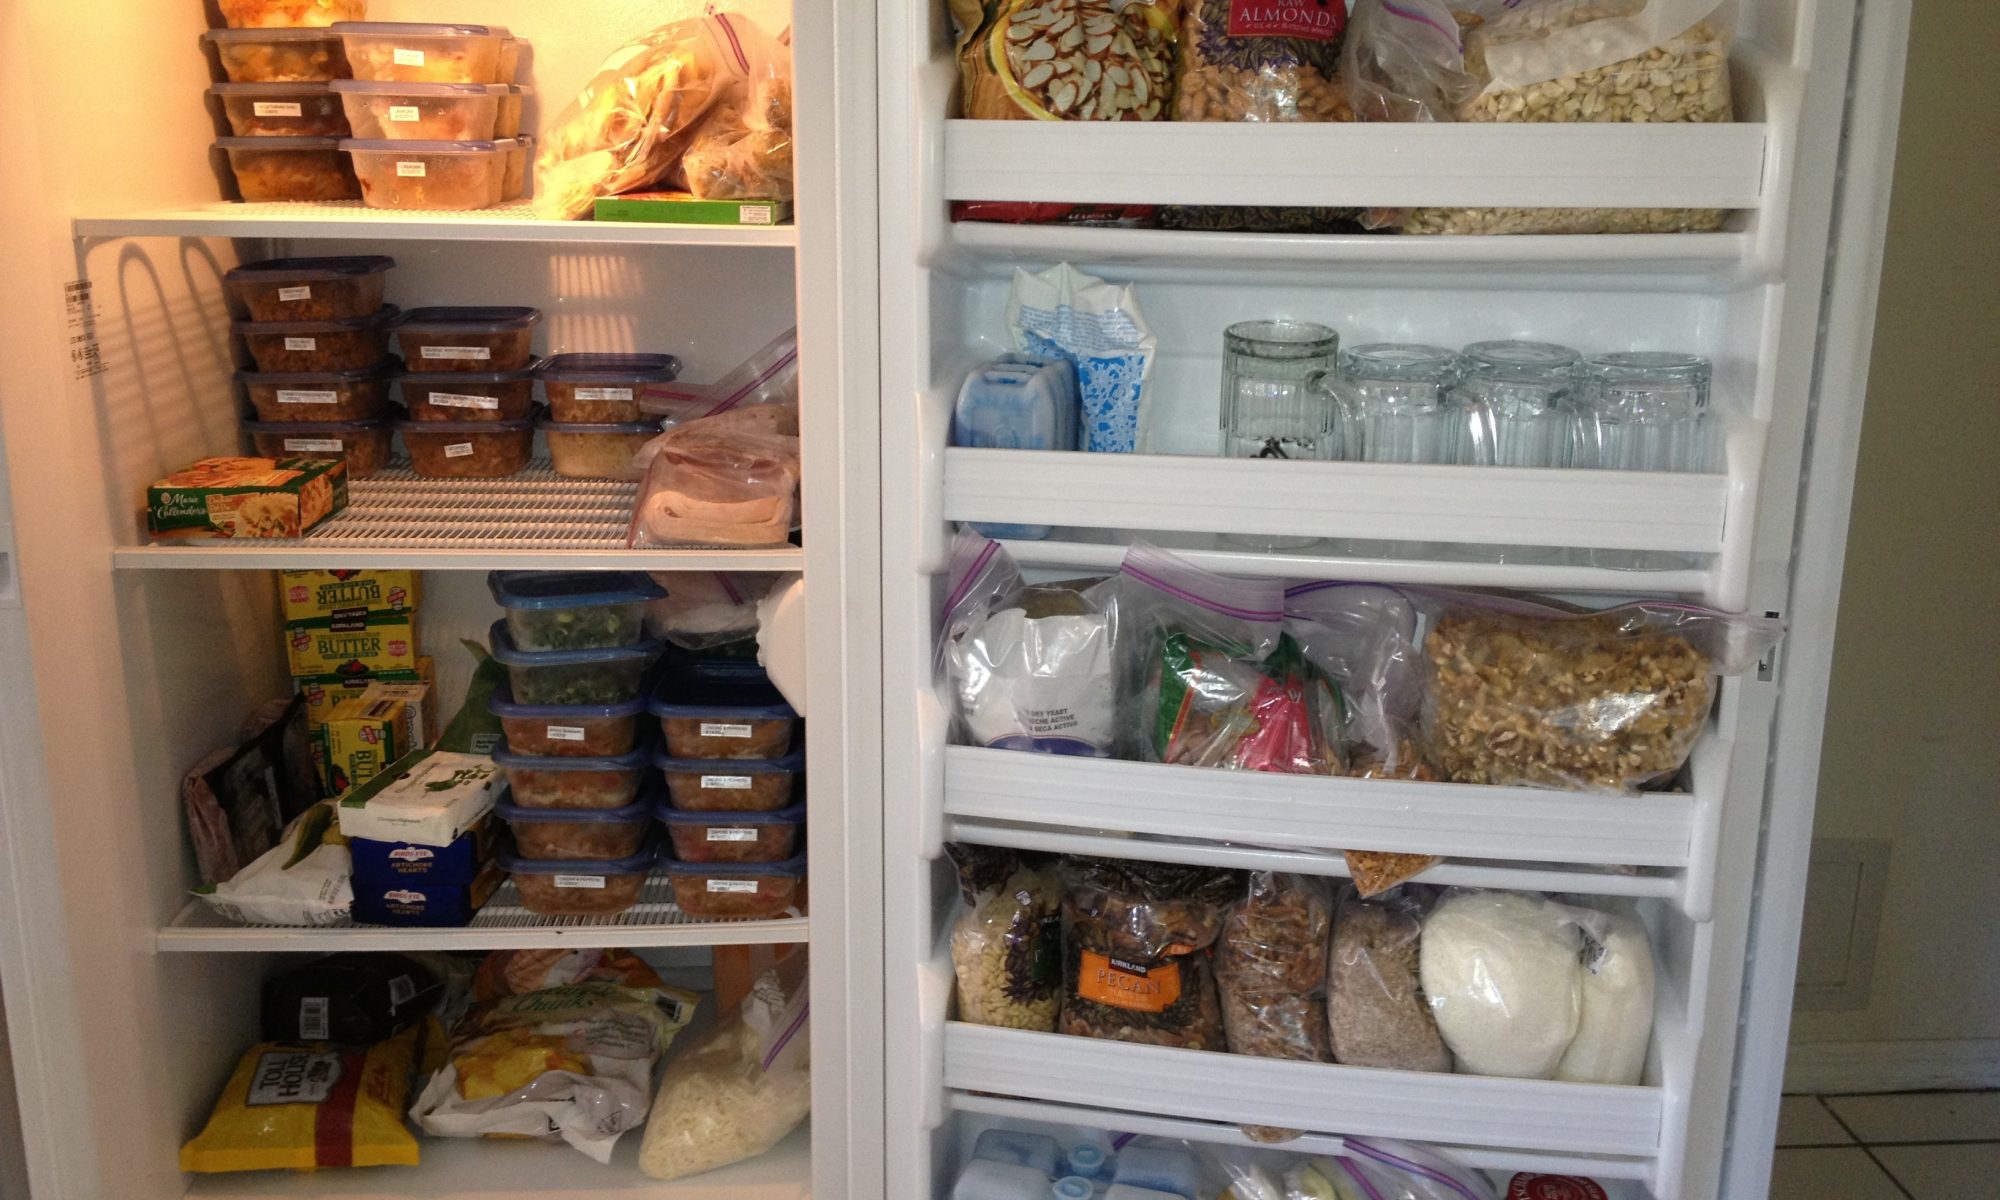
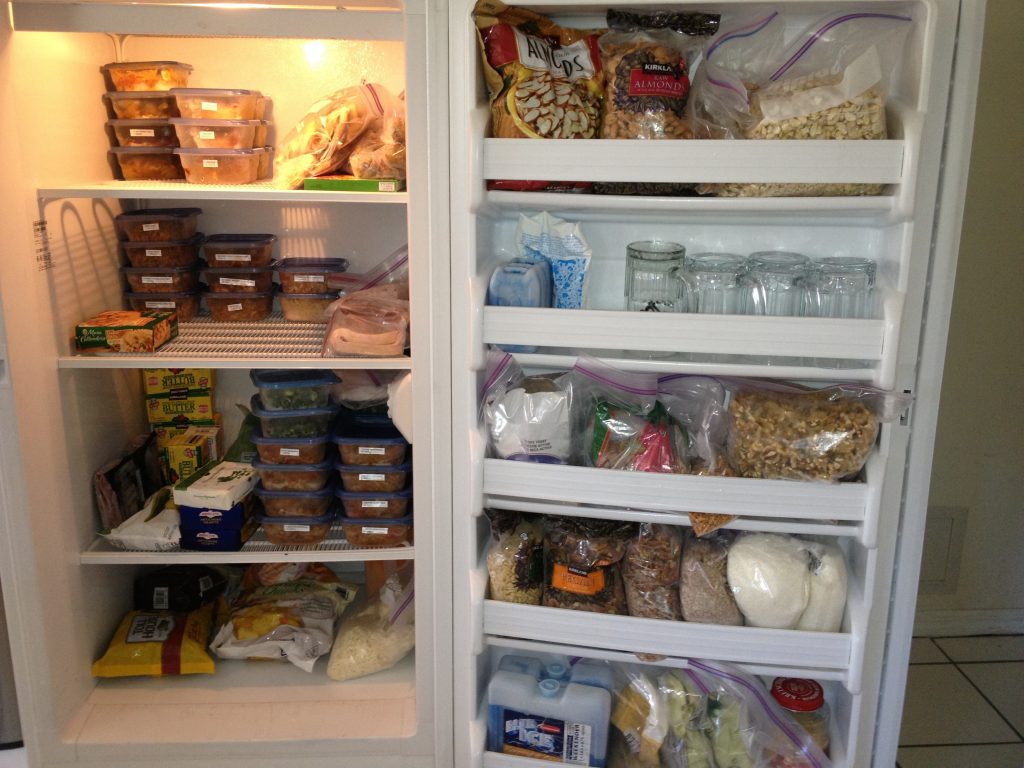
One oft-repeated piece of advice is that you should plan meals before you go grocery shopping and only buy what you need for those meals. I don’t adhere to this advice because it does not work for the diverse dietary needs of our household, which I described in a post written prior to the start of this series. I either have meals in the freezer or I have components made so I can assemble quick meals.
When I cook, I’m either cooking several meals at once and packaging them for the freezer, making components so that I can have everything ready for a quick meal, or I’m putting together a quick meal. Cooking in this fashion makes buying in bulk a reasonable option for a small household and allows me to make the best use of sales. It also means that what we eat on any given day is easily adjusted based on our particular food cravings and schedule.
Take yesterday, for example
I had an eye doctor appointment at 3:00 pm. The doctor’s office is a bit of a drive and they ended up combining my two appointments (I was supposed to have another one on Thursday) into one, so I ended up being at the doctor longer than expected. The doctor dilated my eyes, which made it difficult to see for two or three hours after the appointment.
We were also started laying tile in the bathroom. We worked on that until about an hour before we needed to leave for my appointment. When we got home we worked on it for another couple of hours.
It was 7:30 pm by the time I was contemplating dinner, I was feeling rather tired and a little woe-be-gone, for no apparent reason. I was seriously craving Indian food.
It’s not a surprise that I was craving Indian food. It was my favorite cuisine in the world, even before I got to go there. We spent a couple weeks in Indian in 2015 — Chris had to go for work and I tagged along. I ate Indian food 3 meals a day the entire time, despite the easy availability of Western food in the very Western hotel where we stayed. When we were leaving, Chris asked if I was tired of Indian food. Answer: Absolutely not. Indian food is comfort food to me. It’s the food I crave when I don’t feel well, physically or mentally. Just the smell of Indian cooking can lift my spirits.
So it’s late and I’m hungry and a little despondent and I have no Indian food in the freezer. I started perusing the take out menu of the nearest Indian restaurant. It’s expensive and they don’t deliver and it’s at least 45 minutes round trip for me to pick it up myself. I considered going to Publix and getting a frozen Indian dinner. They are less expensive and since Publix is closer, it would be faster. But the portion is very small and the flavor, while not terrible, isn’t particularly authentic.
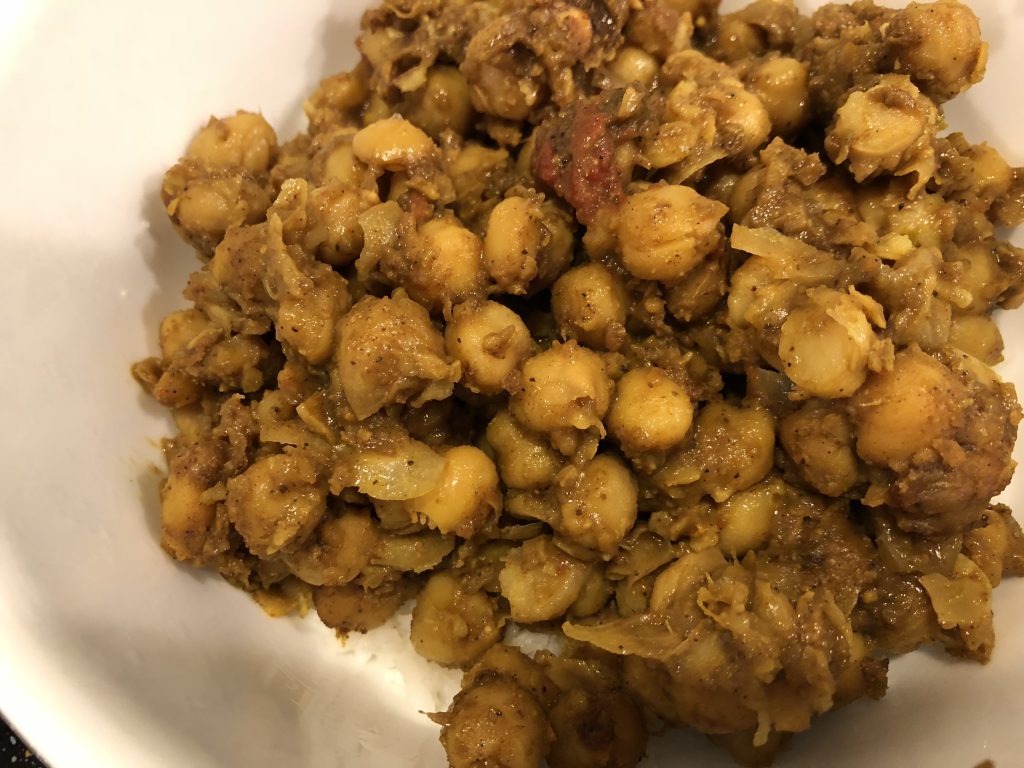
Finally, I did what I should have done in the first place. I pulled out my copy of the Indian Instant Pot Cookbook by Urvashi Pitre (Amazon affiliate link) and turned to the Chana Masala recipe (that’s chick peas in a flavorful tomato-based sauce). Even if it took me a hour to make the recipe, that’s not much longer than getting take out, it’s a lot cheaper, and the flavor is as good as the restaurant.
When I looked at the recipe, I realized I could have it done in 20 minutes, because I had all the time-consuming parts of the recipe already made. All I had to do was combine them with the other seasonings and let everything cook for 15 minutes to warm up and allow the flavors to blend.
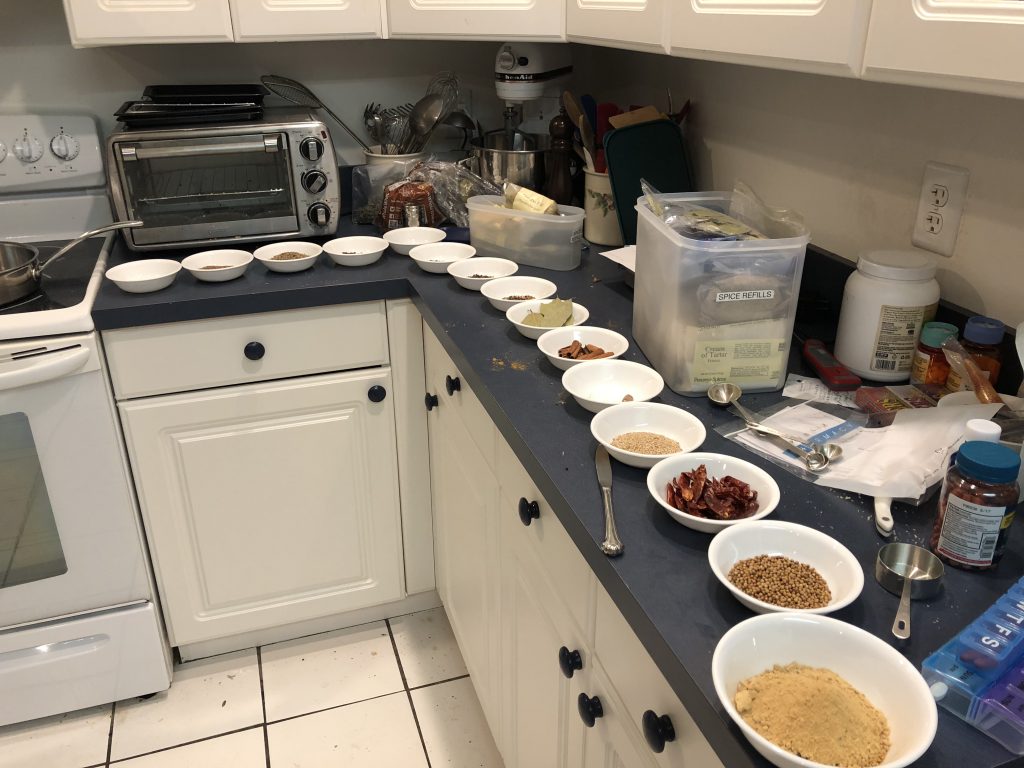
There’s three potentially time-consuming parts of the recipe — cooking the chickpeas, making Onion Masala, and making the chana masala spice blend (the recipe suggests purchasing a blend). Last week, I cooked up two pounds of dried chick peas, intending to make hummus and falafel, but haven’t gotten around to making them. Several months ago, I made a huge batch of Onion Masala and froze it in smaller batches, in the portion size needed for this Chana Masala recipe. A couple months ago, I made my own chana masala spice blend and stored it in the cupboard.
There’s a few ingredients in the Chana Masala Spice Blend!
I also already had two specialty ingredients, one which the recipe requires and the other of which the recipe suggests. The required ingredient is ghee, a clarified butter. While it is possible and easy to make ghee at home, I have a store-bought version, leftover from the butter tasting I mentioned in Part 5 of this series. The suggested ingredient is amchoor (also spelled amchur) powder, which is made from unripe, sour mangoes. Chana Masala requires some acid, traditionally achieved by using amchoor. The Indian Instant Pot Cookbook calls for lemon juice because people only have amchoor in their pantries if they regularly make Indian cuisine and the cookbook is intended to reach an audience beyond those regularly making Indian cuisine. However, the recipe has a side note telling you how much amchoor powder to use if you wish to omit the lemon juice. I have amchoor powder in my pantry so I used that instead of lemon juice.
I also had some leftover basmati rice in the refrigerator, so didn’t even have to cook rice. This is what it looks like when all the cooking and shopping strategies I’ve described work together — from craving to finished Indian dish in 20 minutes, entirely cooked from scratch.
It cost roughly $4 to make the chana masala, including the cost of the Onion Masala, chana masala spice mix, and the rice. The quantity I made is the same as two restaurant portions, which would have cost $25 plus tax and tip, and the size of at least four, maybe as many as six frozen channa masala premade meals, purchased at Publix for a cost of $20 – $30 total. I got exactly what I wanted, faster and at 15-20% of what I would otherwise spend.
Chris has to eat, too
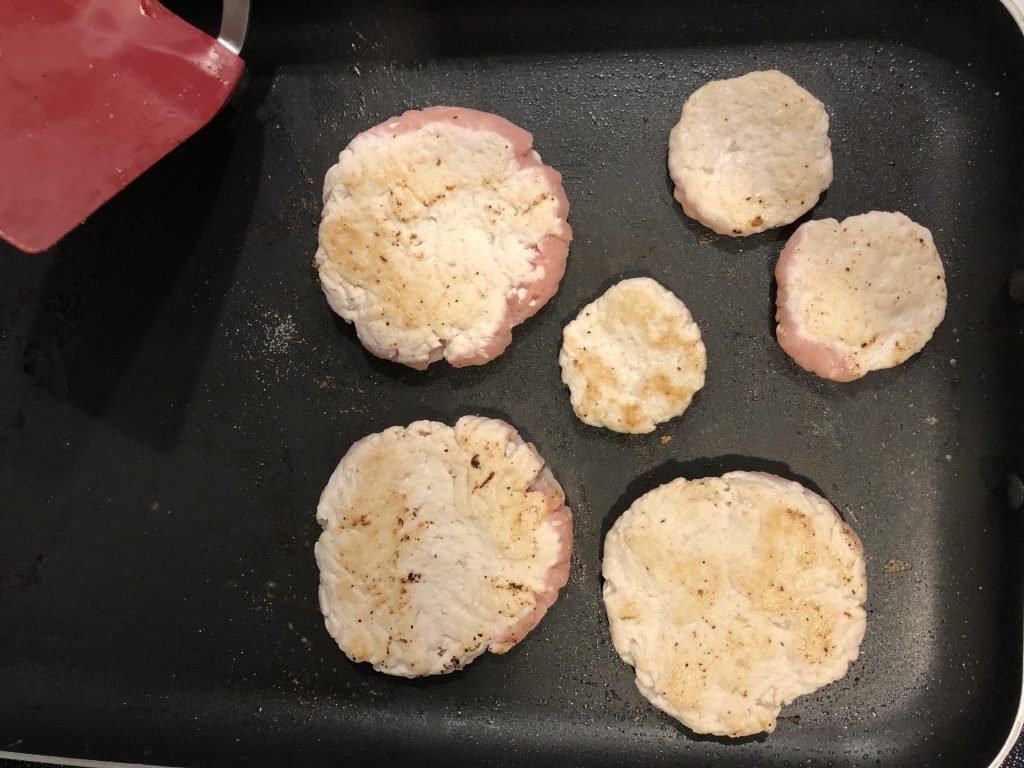
In case you’re wondering, Chris had what he was already planning to eat — a turkey burger. He buys 1 pound packages of ground turkey and makes four burgers at once. He also cooks up four strips of bacon.
Sometimes he makes 3 big burgers and 3 little burgers so Tiger can have his own little burger and Chris can eat in peace!
On days like today, when neither of us fancy doing a lot of cooking, Chris takes one of his precooked burgers and a precooked strip of bacon from the refrigerator, warms them up in the toaster oven, toasts some bread and assembles his sandwich. The bread and ketchup on his sandwich are not homemade (gluten free bread is on my list of things to learn how to make) and the lettuce is store-bought because we aren’t running our hydroponic system at the moment. The sandwich costs roughly $3 to make and takes only a few minutes to assemble when all the components just need to be toasted.
Conclusion
I decided to sneak this extra post into the series because it provides such a beautiful illustration of how all the various pieces I’ve been describing come together in our day-to-day lives. It is true that the shopping and money-saving tools I’ve described in this series so far can take a little time to implement. It is also true that implementing these tools can save you time when you are in a crunch. When all the pieces come together as intended, which they did for us yesterday, I think it makes the time spent on implementation worthwhile.
For the previous posts in this series click Part 1, Part 2, Part 3, Part 4, Part 5, Part 6a, and Part 6b.This post contains affiliate links. If you make a qualifying purchase after clicking a link, we may receive a percentage of the purchase price.
I am still working on the post re: accounting for your time, so decided to add an extra post here on making your own food. The post on accounting for time, should be out tomorrow — as long as my eyes return to normal quickly after getting dilated this afternoon as part of a routine annual appointment. If they don’t I won’t be able to see the screen to type and the post on accounting for your time will be shoved off one more day.
When I was growing up, we rarely ate out. My mother prepared all the meals that we ate. Some of our meals were simple — packaged breakfast cereal and milk, sandwiches for lunch — but my mom made a hot dinner for us every day.
I started learning to cook when I was 11 or 12. We moved from Connecticut to Massachusetts and my mother went from working part-time in the evenings to full-time during the day. At first, when I started helping with food, my mom would prepare a roast or something for dinner and leave it in the refrigerator. I would put it into the oven so that it would be ready to eat at our regular dinner time. Eventually, I learned to help prepare components of meals or entire meals.
By the time I was a newlywed, I had some basic cooking skills, but still had a lot to learn. I grew up in a vegetarian household and all of the cooking I’d done was vegetarian. My new husband was not a vegetarian and wanted to eat meat at home. I clearly remember the first November of our marriage when his boss gave him a turkey as a holiday bonus. I had never made a turkey and did not know where to start. I also remember how grossed out I was to touch that thing — I wore medical gloves when rinsing the turkey and removing the gizzards from the cavity because I did not want to touch it!
Like my mother, I focused primarily on dinner, once all the food preparations were my responsibility. The Tightwad Gazette by Amy Dacyczyn (Amazon affiliate link) opened my eyes to other options and taught me to think critically about every packaged food I purchased. I started to ask myself, “Can I make this?” and found that the answer was often, not just ‘yes,’ but quickly and at a great savings. Even if you cook all the time, perhaps you haven’t considered some of the categories below. If you have not cooked before, think about trying some of these items. You don’t have to start with making a big meal!
Snacks
This is a huge and varied category. It might mean cookies — I make so many chocolate chip cookies that I have the recipe memorized and the time from Chris’ request for cookies to hot out of the oven is no more than 25 minutes. It might mean carrot sticks. I used to buy baby carrots, until I learned that they are full-sized carrots milled to size (external link to Washington Post article). Cutting carrot sticks is not that hard and does not take much time. I cut enough carrot sticks for four or five servings and keep them in containers in the produce drawer so we can grab them whenever we like. The bottom line here is that many snacks are easy to prepare, far less expensive to prepare than to buy, and a fun way to learn cooking techniques!
Condiments
Mayonnaise is quick, easy, and inexpensive to make. Two egg yolks, a cup of oil, a little vinegar or lemon juice, and some seasonings makes about 1.5 cups of mayonnaise. This takes maybe 5 minutes if you use a blender rather than whisking by hand. Homemade will cost roughly $1.30, depending on which type of oil you use and the price of lemon juice. The same amount of store bought costs $2.50 – $3.70, depending on brand.
Vinaigrettes are incredibly easy to make. The classic ratio is 3 parts oil to 1 part acid (vinegar or lemon juice); use that as a starting point, but recognize that this is a rule that can be broken (external link to Bon Appetit article). That means 1 cup of vinaigrette is 3/4 cup oil and 1/4 cup. Add salt, herbs, and other additions (chopped vegetables). Play around with different oil-acid combinations and different additions. See what you like!
Another reason to look at making your own condiments is so you can make something to meet your dietary restrictions. For example, I love Thai food but almost all Thai dishes use fish sauce, made from fermented fish, rather than salt for seasoning. I can make vegan fish sauce (external link to Vermilion Roots blog) to use in homemade Pad Thai or Thai curry.
Not all condiments are easy to make. Ketchup, for example, can be made at home, but takes a long time. It might be worth it if you make a big batch at once and can it, but this is probably not where you want to start on your quest to save money or learn how to cook.
Look at all the condiments you have in your house and do a little research on how to make them. You may be surprised to find that things you are spending a lot of money on are easy to make and the homemade versions cost pennies compared to the store-bought ones you’ve been using.
Spice Blends
There’s almost no reason to buy a spice blend ever. Maybe if you are trying a new cuisine and aren’t sure that you are going to like it. Pick a cuisine and do a little research on it and you’ll find that it is built on a relatively small range of flavor profiles, usually based on the spices, herbs, and vegetables that were local to that area 400 – 500 years ago. In the years since then, spices and herbs have been traded across the globe and cuisines now include overlapping ingredients. Learn what spices and herbs make up the flavor profiles in the cuisines you like best. Stock the individual spices and herbs and make your own spice blends as needed.
Conclusion
The categories listed here are meant to give you a starting point. If you want to save the most money, you eventually need to look critically at everything you buy that is already prepared. Any food that is made commercially can also be made at home, given the right combination of time, tools, and ingredients. It is possible to can tomatoes, cook dried beans instead of buying canned, make bread, pasta (see, for example, the Pasta Grannies YouTube Channel), jam and every other food under the sun. People made their own food for millennia. Our current era of widely available, pre-packaged foods is maybe 75 years old (post-World War II) and its roots only go back to the Iate-19th and early-20th century. The trick in our time is figuring out which foods can be made inexpensively, quickly, and deliciously. Start with what is easy for you and grow from there.
For the previous posts in this series click Part 1, Part 2, Part 3, Part 4, Part 5 and Part 6a.This post contains affiliate links. If you make a qualifying purchase after clicking a link, we may receive a percentage of the purchase price.
Yesterday, we talked about calculating the cost of ingredients and setting up a spreadsheet. Today, it’s time to put a recipe into the spreadsheet so we can figure out how much it cost, then compare that cost to the store bought product it is meant to replace.
About the Recipes
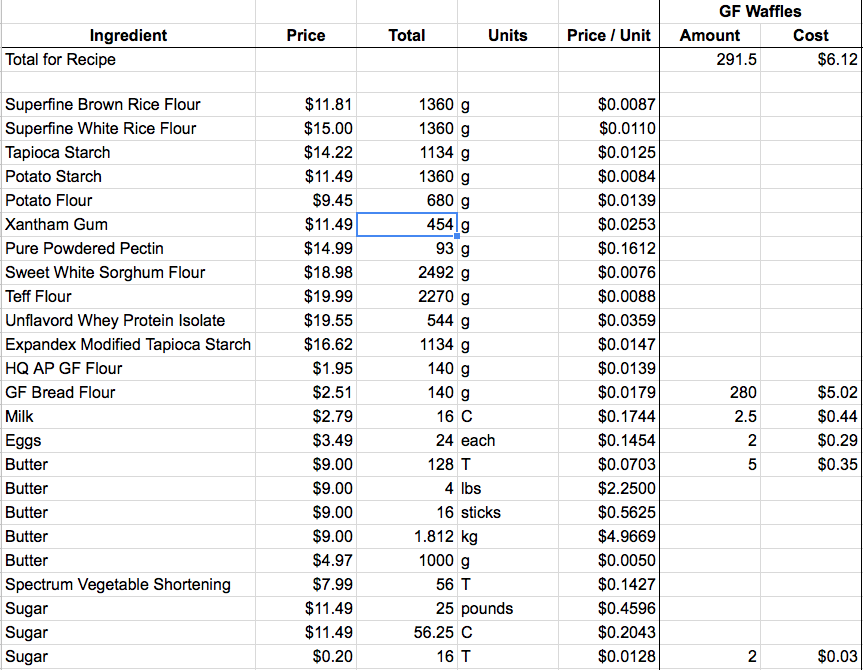
The recipe I’m using for comparison is Yeast-Raised Waffles from the book Gluten-Free on a Shoestring Bakes Bread by Nicole Hunn (Amazon affiliate link). This particular recipe is not available on the Gluten-Free on a Shoestring blog. The spreadsheet screenshots in this post do not include two of the ingredients in the recipe — yeast and salt. I purchase those ingredients very infrequently and in bulk at Costco. At the quantities in this recipe, the two together add less than $0.05, so omitting them on the spreadsheet does not appreciably impact the overall analysis.
Nicole Hunn developed her own gluten-free flour blends and all of her other recipes use one of her own blends. The recipes for the blends are available on her blog. The ingredients and quantities included on the spreadsheet for the two flour blends are the complete list.
Add a Recipe
Once the ingredients are in the spreadsheet, adding a recipe is pretty quick. You need two columns for the recipe. The column labeled ‘Amount’ is the quantity of the particular ingredient in the recipe. The column labeled ‘Cost’ is a formula.
Amount
This column is a manually entered static number. I open up the recipe book and go down the list, adding the quantity of ingredients. When you have ingredients with multiple entries (both butter and sugar in the waffle recipe), make sure you are entering the quantity on the line that matches the units in this particular recipe.
Price
The formula contains two cell addresses, multiplied together. The first cell reference is to the Price / Unit cell for that row. The second cell reference is the Amount cell for that row. (Price / Unit) * Amount. For sugar, the actual entry in the Cost cell is: =E28*R28. E28 is the cost of 1 tablespoon of sugar. R28 is the number of tablespoons of sugar (2) in this recipe.
Total Per Recipe
Finally, we need to calculate the total cost of the recipe. You can see that I put this information at the top of the column instead the bottom of the column. I did that because the spreadsheet will eventually have a long list of ingredients and I didn’t want to have to scroll all the way to the bottom to see the Total.
The formula in the Cost column is a sum of the column. The entry is =Sum(S5:S300). The reason I went all the way down 300 rows is because I don’t know how many ingredients will end up being in the spreadsheet and when I reorganize into alphabetical order, I don’t know how far down the ingredients in this recipe will be. I don’t want to break my formulas if I don’t have to, so I put in a number that it is much higher than the number of ingredients I expect will be listed in this spreadsheet.
I’ve calculated the total for both the Amount column and the Cost column. There’s really no reason for that and the number in the Amount column is not useful because ingredients are measured with two different measuring systems (butter and sugar by volume and everything else by metric weight).
Compare Your Recipe Cost to the Cost of Prepared Food
In order to make the financial comparison, you must make an honest comparison with the food the homemade version is meant to replace. If you might buy any of several different brands, you should compare your homemade version to the lowest cost prepared food you would otherwise buy. The trickiest part of the homemade to prepared food comparison is making sure you compare equal quantities of the foods, whether that is serving sizes or weight.
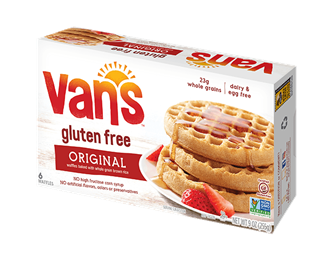
In the case of the gluten-free waffles I’m using for illustration purposes, our comparison product is Vans Original Gluten-Free Waffles (not an affiliate link. This link to Van’s website is provided because they have the nutritional label and that may be useful for comparison purposes as you read).
When Chris decided to reduce the amount of gluten he was eating, waffles was his first major concern. He loves waffles with eggs and bacon for breakfast and, often, for dinner. He tried a couple different brands and Vans were his favorite, so that is what we have been buying. We can get them at either Publix or Whole Foods and the price is the same in both places: $5.50 per box of 6 waffles. He eats one waffle per meal.
It cost $6.12 to make the Gluten-Free Waffle recipe. At first glance, it looks like the Vans are less expensive than homemade, but is that true? In order to know for sure, we have to look at how many servings the homemade recipe makes.
This is what one waffle looks like, just out of our waffle maker. The Gluten Free Waffle recipe made 7 full waffles plus 3 additional hearts. After I make waffles, I break up the big waffles into individual hearts. I line a cookie sheet with wax paper and put the hearts onto the sheet. I usually need multiple layers and I separate them with more wax paper. I then put the entire cookie sheet into the freezer.
When the waffles are frozen, I take the cookie sheet out of the freezer and transfer the waffles to a gallon-size Ziploc bag, which I label with the date I made the waffles. The reason I freeze them in this fashion is because the individual hearts do not stick together in the Ziploc bag if you put them in there already frozen. You can take out as many as you want to eat and pop them into the toaster oven to reheat them.
Since this was the first time I made this particular recipe, I weighed one of the big waffles and compared it to the box of Vans. The 7 big waffles were the equivalent of 15 individual Vans waffles, so 2.5 boxes worth. That means that, by weight of products it would cost $13.75 to buy the same amount of waffles that I made for $6.12.
I’m not sure weight is the best comparison in this instance, however. By weight, it takes 2.5 homemade heart waffles to equal 1 Vans waffle. We all know Chris is not going to eat 2.5 heart waffles at a time. He’s going to eat 2 or he’s going to eat 3. The recipe made a total of 38 hearts (7 big waffles * 5 hearts per big waffle + 3 extras). That works out to 13 servings or 2 boxes plus one Vans waffles. By likely serving size, we would pay $11.92 to buy the same amount of waffles that I made for $6.12.
In this case, it is clear that no matter how I measure, making the waffles is less expensive than purchasing the Vans waffles. Of course, our goal isn’t just the lowest cost. It is food that (1) tastes good and (2) promotes health (3) at the lowest possible cost, with an eye to the (4) time it takes to procure, prepare, and clean-up our food. Therefore, I think it’s important to note that Chris liked the taste of the homemade waffles at least as well, if not better, than the Vans!
Up Next
In this series so far, I’ve presented several tools and strategies that I learned when I was a young newlywed with little money to spend on anything. All of these strategies can save us money, but using them requires another precious resource: Time. How do we account for the time it takes to use these various strategies? Does the time involved mean there’s no point to using these strategies? Tomorrow, I’m finally going to write about time and introduce you to another resource that I first encountered at the same time that I found The Tightwad Gazette (Amazon affiliate link).
For the previous posts in this series click Part 1, Part 2, Part 3, Part 4, and Part 5.This post contains affiliate links. If you make a qualifying purchase after clicking a link, we may receive a percentage of the purchase price.
When I was growing up, one underlying assumption of saving money on groceries is that it was less expensive to make food yourself than it was to buy processed foods. Frugal writers often issue the imperative that to save money you must make your own, without offering any justification for this statement. It’s the kind of wisdom that seems like it must be true, so let’s just all agree that it is. It’s also the kind of wisdom that must be examined, if our goal is to choose the lowest cost option.
There are three factors to creating your own foods: cost of ingredients, cost of electricity or gas for your cooking appliances, and the cost of time. The Complete Tightwad Gazette by Amy Dacyczyn (Amazon affiliate link), gave me the tools for calculating the first two of these costs. I am not going to discuss the cost of running appliances in this series.
Today’s post is about accounting for the cost of ingredients. In tomorrow’s post, I’ll discuss how to use the cost of ingredients to calculate the cost of a recipe and compare that to similar prepared foods. Monday’s post is about factoring your time into all of the strategies discussed in this series. Tuesday’s post will wrap up this series by discussing some of the strategies I’ve developed through using these tools.
Calculating Your Cost Per Recipe
If you’ve been reading this series, you’ve probably figured out by now that I love math. If you’ve known me a while, or if you’ve read my other blog, especially the post on Crafting CPH (Cost Per Hour), you long ago figured out that I love math. Either way, by now you know enough about me to know that when I came across Amy Dacyczyn’s article on Calculating C.P.M. (Cost Per Muffin), I was immediately hooked and happy as a math geek with a page full of numbers gets.
Calculating the cost of a recipe is a straightforward process. Figure out how much a unit of each ingredient costs, multiply the amount of the ingredient used in the recipe by the unit cost of the ingredient, add up the cost of all the ingredients used in the recipe, and divide that cost by the number of servings the recipe produces. Compare the cost of a homemade serving to the cost of an already prepared serving. In this endeavor, your time spent calculating can be minimal because a spreadsheet is your friend.
Calculate Unit Cost
Q: If we’ve been diligently following the steps laid out in this series of columns, haven’t we already done this?
A: Maybe. Probably not.
What is a unit?
The issue here comes down to the question we asked ourselves before: What is a unit? When you are shopping the quickest way to make comparisons between different brands of raw ingredients is usually the weight of the package, so your units will be in ounces or grams. When you are cooking, you can measure the ingredients by volume, Imperial weight (ounces and pounds), or metric weight (grams and kilos).
If you are like the majority of people in the United States, you use volume to measure your ingredients when cooking or baking and recipes, whether in books or online, intended for distribution in the United States rarely include anything other than a volume measurement. Outside the United States, it is more likely that recipes are measured in metric weight.
I personally use volume for cooking. Sometimes that means with a measuring cup and sometimes it means eyeballing it. When I’m baking, however, I use metric weight to measure ingredients. (I’ll save the detour on why for a future post).
Some ingredients might be measured in various ways, depending on the recipe. For example, if I’m making a white sauce, I measure butter by the tablespoon. If I’m making a cake, I weigh the butter in grams.
Equivalencies
If you need to find a volume measurement, look at the nutrition and serving size label on your product. On most products, the serving size is a volume measurement. Unfortunately, that volume measurement may not use the same units as your recipe and you will have to figure out how the two relate to each other.
If you have a smart phone, there are apps for this. But here’s some equivalents for you anyway:
Volume
1 Tablespoon = 3 teaspoons
1 Cup = 16 Tablespoons = 8 fluid ounces
1 Pint = 2 Cups
1 Quart = 4 Cups
1 Gallon = 4 Quarts = 16 Gallons
1 Fluid Ounce = 29.5735 milliliters
1 Liter = 1000 milliliters
Weight
1 Pound = 16 Ounces
4 Ounces = 112 grams
1 Kilo = 1000 grams =2.2 pounds
The Basic Formula
To calculate the cost of ingredient, divide the price by the number of units. Some ingredients may only require a single calculation because you only measure them in one way. If you measure an ingredient in different units, depending on the recipe, you will need to make a calculation for each form of measurement. I might measure sugar by the cup, tablespoon, teaspoon, pound, ounce, kilogram, or gram, depending on the recipe. Each of these different measurements is the same calculation: price paid for the package divided by the number of units of that size in the package.
A Spreadsheet is Your Friend
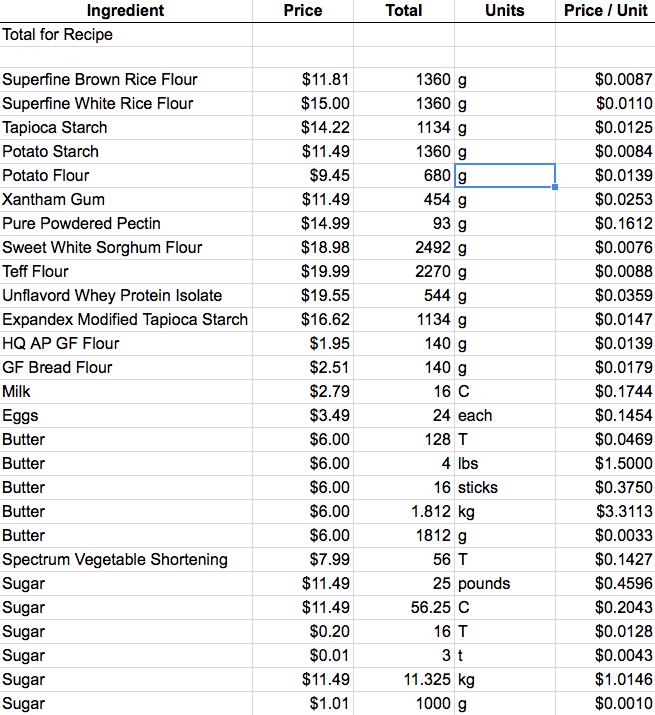
I recently started a spreadsheet to calculate the cost of making gluten free items. The remainder of this blog post is the technical documentation explaining how I set up that spreadsheet, so you can use that information to set up a spreadsheet also. It is a little bit of work to set up the spreadsheet, but once it is set up in the way described here, maintenance is easy!
The recipes included on this spreadsheet all come from the Gluten Free on a Shoestring blog. The author of that blog developed her own gluten free flour recipes and uses that flour as the basis for all of her other recipes. The first six recipe columns of my spreadsheet calculate the cost of the various flour blends. The flour blends are also listed as ingredients since they will be used in making other recipes.
This spreadsheet does not yet reflect an accurate total for either the waffles or the chocolate chip cookies included on the sheet. Since this is a new spreadsheet, since I had not been carefully tracking the price of various ingredients, and since I used pantry ingredients like brown sugar, which were purchased some time ago at an unknown cost, those ingredients are not yet on the sheet. Next time I buy those ingredients I will update the spreadsheet with that information.
Enter Your Ingredients
This is all the ingredients I’ve entered into my spreadsheet so far. I manually enter the information in the columns labeled Ingredient and Units. For the Price and Total columns, I manually entered the number, but many of these entries are cell references or formulas rather than static numbers. The Price / Unit column is a formula.
Ingredient Column
I entered ingredients while looking at recipes and have not sorted them in any fashion. Eventually, I will sort them in alphabetical order. As I’m looking at this now, I realize that I’m probably going to want to change the names so that an alphabetical sort makes sense.
When the spreadsheet only has a handful of ingredients, the name I use isn’t a big deal. If I have 100 or more entries, I don’t want to be able to find a particular entry quickly. For example, if I sort alphabetically right now, Superfine Brown Rice Flour is going to be in S. I’m not going to look for it there. I’m going to want to change it to Flour, Superfine Brown Rice or Flour, Rice, Brown, Superfine or some variation thereof. The important thing is that it’s first and foremost Flour, so that should be the first word!
Price, Total, and Units Columns
The price is the actual amount you paid for the product. The Total is the number of units in the product. The Units is the name of the units used.
Every formula is only as accurate as the data it uses. If our price or total entries are incorrect, the Price / Unit generated by the spreadsheet is just a random number. Therefore, we have to think carefully about how to make entries in the Price and Total Columns.
On my spreadsheet, the information in the Price and Total Columns is a combination of manual entries, cell references, and formulas. In this section, I’ll describe the options and when to use each one.
A Single Entry
If the ingredient only needs one entry, all you need to do is pick the relevant level of units and manually fill in the information across the row. Your Total Units can either be the weight of the product, as it is for every ingredient currently on my spreadsheet, or it can be a volume measurement obtained from the serving size label on the product.
Whether you use a volume or weight measurement, your single entry should be something that makes sense for the way you use the product. If the serving size on the label does not make sense for the way you use the product, your units may be a formula.
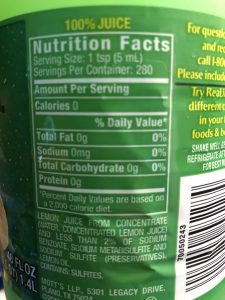
For example, this bottle of lemon juice uses 1 teaspoon as a serving size and has 280 teaspoons per bottle.
If I will only ever use the lemon juice 1 Tablespoon at a time, I can put the formula =280 / 3 (total teaspoons in bottle divided by 3 teaspoons in one tablespoon) into the Total column and never think about it again — unless I buy a bottle with a different number of teaspoons.
Multiple Entries
If you need multiple entries for a single ingredient because you may measure it in different ways when cooking, that’s when things get more complicated.
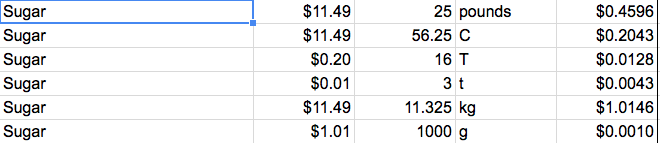
When I need multiple entries, the first entry I make for that ingredient is exactly as I purchased it. For example, the first entry here for sugar is $11.49 for a 25 pound sack. I bought this sugar at Costco and this entry reflects exactly the size of that single bag of sugar. All of the other entries include at least one cell reference or formula in the Price or Total column.
The reason I set my sheet up this way is because I want the ongoing maintenance of this system to be easy. I do not mind taking some time to set it up, but I do not want to manually calculate or enter 6 different values for sugar every time I buy a new bag.
The combination of manual entry, cell references, and formulas in the spreadsheet is calibrated so that if I buy another 25 pound bag, all I need to do is change the price on the $11.49 / 25 pound line. All of the remaining entries for sugar will update automatically. If I buy a 10 pound bag of sugar rather than a 25 pound bag of sugar, all I need to do is enter the new price and weight on the $11.49 / 25 pound line and all of the remaining entries for sugar will update automatically.
In order to get the correct combination of manual entry, cell references, and formulas for a particular ingredient, it matters if you start from a larger unit and work down (the sugar example) or if you start from a smaller unit and work up (the lemon juice example). Let’s look at how to do the formulas in each instance.
Starting with Larger Units
When starting with Larger Units, your Price column will always contain a cell reference, either to the Price cell of the first entry or to the Price / Unit cell of the next largest relevant measurement. The Total column will either be a formula or a static number, entered manually. If the Total column includes a formula, that formula will include a cell reference to the Total cell of the first entry.
I want price / unit for all three measurement options — volume, Imperial weight, and metric weight — because sugar is a product that I might use in a variety recipes with differing measurement systems. Therefore, my first equations are the ones needed to convert between the different measurement systems. Once I have a starting point for each measurement system, my next set of equations provide the price for the smaller measurements within that system.
If I wanted to go straight from $11.49 / 25 pounds of the sugar package as purchased to a price / teaspoon, one way or another, I have to do the following steps:
Calculate the price per pound ($11.49 / 25)
Calculate the price per cup ($11.49 / 25 * 2.25)
Calculate the price per tablespoon ($11.49 / 25 * 2.25 / 16)
Calculate the price per teaspoon ($11.49 / 25 * 2.25 / 16 / 3)
Clearly, this is an iterative process. I manually enter numbers when they are encountered for the first time. After that, I use cell references to refer to the already completed calculations. For the pounds to teaspoons calculations, that looks like this:
Calculate the price per pound: Manually enter $11.49 in Price column and 25 in Total column
Calculate the price per cup: This is a conversion row because I am switching from one measurement system to another. In conversion rows, the Price cell is a reference to the price cell of the first entry (=B26) because the price of the entire package is the same, regardless of how you measure it! When I manually update the price in the first row, the cell reference means this cell will automatically update.
In conversion rows, the Total entry is a formula that references the measurement of the first entry. I might buy 5, 10, or 25 pound bags of sugar based on what the unit pricing in the store tells me is a better deal. By referring back to Totals column in the first entry rather than using a static number, I can change only the first entry and all the other cells will update accordingly.
To convert from weight to volume, you can either look at the serving sizes, look up your product on the internet, or measure 1 cup of the product and weigh it. A quick Google search tells me that 1 pound of sugar = 2.25 cups. The full equation for the Total cell for the Cups row is: =C26 * 2.25.
Calculate the price per tablespoon. Now I am reducing from one measurement to another in the same measurement system. I know there are 16 tablespoons in 1 cup, so to find the price per tablespoon, I need to divide the price per cup by 16. The Price entry is a cell address for the Price / Unit in the Cups row (=E27). The Totals entry is a manually entered static number: 16 (tablespoons per cup).
Calculate the price per teaspoon. Again, I am reducing from one measurement to another in the same measurement system. I know there are 3 teaspoons in one tablespoon. To find the price per teaspoon, I need to divide the price per tablespoon by 3. The Price entry is the cell address for the Price / Unit in the tablespoons row (=E28). The Totals entry is a manually entered static number: 3 (teaspoons per tablespoon).
The process for getting prices for metric system measurements is the same.
Calculate the price per pound ($11.49 / 25)
Calculate the price per kilogram ($11.49 / 25 / 2.2)
Calculate the price per gram ($11.49 / 25 / 2.2 / 1000)
Calculate the price per kilogram. This is a conversion row. Therefore, the Price cell is a reference to the price cell of the first entry (=B26). We are converting between two different systems for measuring weight and we already know the conversion factor is 2.2 pounds to a kilogram. The formula for the Totals column is: =C26 / 2.2
Calculate the price per gram. Now we are reducing from one measurement to another in the same measurement. We know there are 1000 grams in a kilogram, so to find the price per gram, I need to divide the price per kilogram by 1000. The Price entry is the cell address for the Price / Unit in the kilograms row (=E30). The Totals entry is a manually entered static number: 1000 (grams per kilogram).
Starting with Smaller Units
If we start with smaller units, we are going in reverse order, and this changes where we need to manually enter static numbers, cell references, and formulas. Let’s use the bottle of lemon juice as an example. I do not remember how much I paid for the bottle, but let’s just say it was $2.00.
The series of calculations we need to do is as follows:
Calculate the Price per teaspoon ($2.00 / 280)
Calculate the Price per tablespoon ($2.00 / 280 * 3)
Calculate the Price per Cup ($2.00 / 280 * 3 * 16)
We have two different options for Price and Total entries when working from the smallest units up to larger units. In option 1, we use a formula in the price column and manually enter the static number 1 in the Total column.
Calculate the price per teaspoon. This is our first entry, so we manually enter $2.00 in the Price column and $2.93 in the Totals column.
Calculate the price per tablespoon. The Price is a formula in which we multiply the price per teaspoon by the number of teaspoons in a tablespoon. We use a cell address reference for the price per teaspoon, which we calculated in the preceding row. In this case, our formula is: =E34 * 3. Since our Price formula reflects the conversion from teaspoons to tablespoons, we manually enter a static 1 in the Totals cell.
Calculate the price per cup. The Price is a formula in which we multiply the price per tablespoon by the number of tablespoons in a cup. We use a cell address reference for the price per tablespoon, which we calculated in the preceding row. In this case, our formula is: =E35 * 3. Since our Price formula reflects the conversion from tablespoons to cups, we manually enter a static 1 in the Totals cell.
In option 2, we use a cell reference in the Price column. That cell reference refers back to the Price / Unit for the next smallest unit. In the Totals cell, we enter a static number reflecting the number of smaller units in the larger unit.
Conversions between measuring systems can be handled three ways when starting from the smallest units and working your way up. (1) You can convert to smallest units across all measuring systems and work your way up in all of them. (2) You can work your way up in your first measuring system, use the largest units to convert to the other measuring systems and work your way down from there. (3) You can use packaging information to getting starting points for each of the measuring systems (the front of the bottle of lemon juice tells me the number of fluid ounces and liters in the bottle) and manually enter a starting point for each. If you choose the third option, you would have to make manual adjustments to the starting point in each measuring system, if you purchase a different size of that product in the future.
Price / Unit
The Price / Unit column is a formula. If you start from the larger units and work your way down or you used option 1 when working from the smallest units on up, the formula is the number in the Price column divided by the number in the Total column.
If you started from the smallest units and worked up and you choose option 2, the formula in the Price column is the number in the Price column multiplied by the number in the Total column.
I personally prefer to use option 1 when working from the smallest units on up because I like to have the Price / Unit formula stay the same for every cell in that column. In the Price and Totals column, my formulas are never going to be consistent because ingredients have a variety of units.
Conclusion
Now that we have ingredients entered and we know how much they cost us using various units of measurements, it is time calculate how much a particular recipe costs to make and compare that to the prepared products available in the grocery store. Time to add some columns to the spreadsheet!
For the previous posts in this series click Part 1, Part 2, Part 3, and Part 4.This post contains affiliate links. If you make a qualifying purchase after clicking a link, we may receive a percentage of the purchase price.
When I was growing up, we had a newspaper delivered to our home on Sundays. I remember the flyers full of coupons. I would look through the flyers searching for products we use and, when I found one, handing the sheet to my mom so she could cut out the coupon. She kept the cut coupons in alphabetical order in a recipe box with dividers for each letter of the alphabet. When we were grocery shopping, it was almost like a game to figure out which item was a better buy based on combining coupons with items that were already on sale.
My other frugal shopping mentor — The Tightwad Gazette by Amy Dacyczyn (Amazon affiliate link)– also advocated the use of coupons. Despite these stellar early examples, this strategy is one I’ve abandoned at this point in my life and I thought it was worth talking a little bit about why that is.
As always, there’s more than one way to analyze the variables. I have a friend who makes excellent use of coupons and routinely posts on Facebook pictures of her receipts, showing how much she’s saved and spent, along with pictures of the items she bought. I’ve asked her to write a guest post explaining her system. That post will not be ready in time to be part of this series (I only asked her yesterday!), but I will link it here when we publish it. I’m interested to hear what she has to say and find out if there are faults in the analysis I’ve made on this issue!
The World Has Changed
I’m 40-something years old. When I was a child, there were no computers or internet. We got our first home computer when I was in high school and I did not have an e-mail address until my freshman year of college. The only way to get coupons was from flyers in the newspaper, the store sale catalog, or by mailing a letter to companies asking for them.
The Tightwad Gazette (Amazon affiliate link) was mostly written in the pre-and early-Internet era. The book collates newsletters published (and snail mailed to subscribers) from May 1990 to December 1996.
As the world has changed, so have many of the systems and assumptions behind the use of coupons.
No store local to me doubles coupons
When I was a kid, our local supermarket doubled coupons. If the face value was $0.10, you actually got $0.20 off the purchase price. I am not aware of any stores local to me that double coupons. If I’m wrong about that, I’d like to hear differently!
Paper? Hahahahahaha!
I haven’t had a newspaper delivered in years. The last time I checked, which has been many years, the price of a Sunday paper was high enough that the coupons I could get were not enough to cover the cost of purchasing a newspaper. I do not know anyone who has a local paper delivered, so it’s not like I could ask others for the coupons from their Sunday paper.
Privacy
Many people do use coupons and they have to be getting them somewhere. While it’s true that paper isn’t really a thing, the internet is very much a thing and all the resources of the world — including coupons — are available on it.
However, every resource I’ve looked at for coupons requires you to create an account. This includes going directly to the food companies as well as sites that serve as a hub, listing various sales and coupons available on the web.
I am decidedly uncomfortable with the number of accounts I already have on various websites. I recently had a scare where an old account of mine had been hacked. I spent several hours changing passwords on accounts — more than 40 of them. I have never kept a complete list of all the accounts I’ve opened over the years and I’m sure I did not remember all of them. I have no desire to add more accounts, which often means giving the companies permission to contact me (lots of junk mail) and / or sell my data (to whom?), just so I can save a couple bucks on groceries.
Some Things Never Change
Coupons come in two varieties — store coupons and manufacturers’ coupons. No matter who is issuing the coupon, they are doing so for one primary reason: to get money from you.
In the Big Picture, the House Always Wins
Sure, the coupon might save you $0.50 cents on that item, but what about the next time. The manufacturer is betting that you will like their product and will buy it at full price. When a store issues a coupon, they are betting either that you will buy other products too, making up for the $0.50 cents they give you on that one item, or they are betting that in order to get the $10 off your order of $50 or more, you’ll spend $65 when you otherwise would have spent $45. Who hasn’t added a $15 item to their online shopping cart when they only need $5 more to get the free shipping — and the shipping would have been only $5?
The bottom line is that retailers and manufacturers use sophisticated research to manipulate you into parting with your money. If coupons did not benefit them in the long run, coupons would no longer be a thing. Failing to recognize this fundamental truth is like going to Vegas and thinking that the odds are in your favor, not the house’s.
Unlike Vegas, it is possible to beat the odds on a long term basis by failing to fall into some obvious traps when shopping. You don’t have to spend more just because you’ll ‘save’ more off your order. You can choose to purchase a different brand, based on your cold hard data, obtained through unit pricing, your price book, and the other tools which are forthcoming in this series.
Store Brand Products = Name Brand Products?
In general, retailers are not manufacturing the products branded under their name. The products are manufactured by another company and privately labeled for the store. But who is manufacturing the products? Often, it is the name brand company.
For example, in this 2016 interview, Costco CEO Craig Jelinek mentioned that Duracell makes the batteries Costco sells under its Kirkland Signature Brand. If the same company is manufacturing the product, why do Duracell batteries cost so much more than Kirkland Signature batteries? “[Jelinek] explained, ‘Now, this brand here is no advertising, there’s no overhead, there’s just packaging. We don’t advertise it. It’s just a brand.'” The strong implication here is that you are paying Duracell extra money just so they can market their product to you and try to convince you that they are better than all the other battery brands in existence.
Just because the name brand company manufactures the store brand product does not always mean that the contents of the package are identical. Sometimes retailers and manufacturers work out a product formula or parameters and the manufacturer produces to those specifications. In that case, the retailer may have a product that is similar, but not identical, to the brand name products. And sometimes, they only stop the production line long enough to change the packaging. If that’s what they are doing, the store brand and name brand are 100% identical products.
The agreements between retailers and manufacturers are business contracts that you and I aren’t going to get to read. Store brands aren’t labeled with the manufacturer names. As a result, there’s no way for us to know which of the two manufacturing scenarios are true for a particular product.
Fun Detour/
What is important for our analysis here is that it is worth trying out the name brand product. Have some fun and set up a blind taste test for friends and family. I did this recently with butter and we had a lot of fun! Chris, my parents, and I tasted 17 different brands. I was the only one who knew what all of the samples were.
If you want to set up a taste test, buy a variety of brands of the same product, purchasing the smallest quantity you can in order to provide a taste to all the people participating in your taste test. Prepare a plate for each person, with small portions of each brand on the same plate. Label each sample with a number or letter. Write a list for yourself, not to be shared until the end of the event, correlating the anonymous label with the brand.
The food should be eaten in the same manner as you would normally eat it. For example, when we did the butter taste test, I put little pats of butter on the plate. I had bread on the side. We each tasted the butter straight, then spread a little bit on the bread and ate it that way.
Give each person a sheet of paper and a writing utensil so they can make notes as they try each sample. Tell everybody to keep their opinions to themselves until the end, so no one is influencing anyone else as you go. Compare thoughts after everyone has finished trying all the samples.
When we did the butter taste test, I did not do a more involved test, like baking batches of cookies with all the different varieties of butter and taste testing the cookies. This is an avenue you can explore also — how does each brand perform under usual cooking conditions?
When you buy each brand, calculate the unit pricing of the brand. After the taste test, match up the unit pricing with the results from your taste test. How do they compare? /fun detour
Coupons = Brand Names
Coupons are a marketing tool. Store brands have no marketing budget. It is the manufacturers who offer coupons for their brand name products. You’re paying more more for brand names in order to cover marketing costs and they give you back a small portion of that premium price in a coupon.
Coupons = Processed Food
When’s the last time you saw a coupon for carrots? I’ve never seen one. Manufacturers take raw ingredients and turn it into something else, then put a label on it. Consumers don’t know exactly what they did in the process of turning the raw ingredients into something else because that information is usually protected as trade secret. Maybe consumers will like the final product and maybe they won’t.
Manufacturers need us to try the product and like it in order to make money, and therefore they spend money on marketing. Marketing tells us, subtly or not, what we should want and what is best for us, rather than providing us with information so we can make our own value judgments. It is about influencing decisions, by manipulating emotions and beliefs. Marketing is not about providing data. Coupons are one facet of that marketing, designed to make us feel like we are getting a good, whether or not that is empirically true.
It’s true that some produce has brand names on it, but a head of romaine lettuce is pretty much a head of romaine lettuce. You might want to know where the product was grown, if it was grown conventionally versus organically, and whether it is genetically modified. Produce in the United States is already labeled with the first two pieces of data. You have most of the information you need to make a decision, based on your values and dietary requirements. What else could a company try to tell you about their product in order for you to only buy their lettuce, rather than the competing brand’s lettuce?
It is true that there are marketing campaigns for some ingredients. For example, I remember ads for milk or almonds or California raisins. But these campaigns are run by interest groups and are not connected to any specific brand. I don’t recall ever seeing an interest group run a coupon valid for ‘almonds,’ with no brand listed. Again, it is companies who ultimately offer coupons for their specific, brand name products.
My Personal Conclusions
When I weigh the above factors, I have a hard time believing that coupons are going to save our household money in the long run. Buying raw ingredients and making my own foods rather than buying processed foods; purchasing store brands rather than brand names; and purchasing from warehouse stores, online retailers, liquidators, and other alternative sources usually save me more money than coupons can. None of these strategies can be combined with coupons. Coupons are not available for the first two strategies and alternative stores such as those listed in the third strategy usually do not accept manufacturers’ coupons.
There’s only one place where coupons might save me money — combining coupons with sales to stock up on nonperishable household and personal care items like toilet paper and deodorant. We purchase a surprisingly limited number of items in these categories, so I have not taken the time to figure out a good process for handling coupons for them. Instead, I purchase these items in bulk at Costco or on Amazon.
I am looking forward to reading my friend’s forthcoming post on using coupons and will re-evaluate my own choices based on her experiences and process. It’s been a while since I’ve made an evaluation of best practice re: coupons and it may be that my analysis is based on outdated data and beliefs.
For the previous posts in this series click Part 1, Part 2, and Part 3.This post contains affiliate links. If you make a qualifying purchase after clicking a link, we may receive a percentage of the purchase price.
When I was a child, my mother went grocery shopping every week or every two weeks. We went to the same store every time. Once in a while, we might go to an outlet store for bread. The Tightwad Gazette by Amy Dacyczyn (Amazon affiliate link) introduced me to the idea that if your goal is the lowest possible price, you must shop at multiple stores.
Why shop at multiple stores?
No store has the lowest price on every single product in the store. The regular price of items will vary depending on arrangements with the product manufacturer or supplier, how quickly products turn over in that location, and many other factors.
Different stores have different items on sale every week. Even if the regular price at Store A is the lowest usual price, the sale price at Store B may be the lowest ever price.
Sale items are often ‘loss leaders’ for the store. A loss leader is an item that is sold below the price the store pays to buy that item in order to stock it in the store. Every time the store sells that item, they lose money on it.
Stores use loss leaders as a way to get you into the store, believing that once you are there, you will buy enough other items that they will still make a profit on your overall purchases. When an item is a loss leader, that sale price may be the lowest you will ever see for that particular item.
Finally, your local chain grocery store is not your only option. If you take a broader look at the stores available to you, you have a better opportunity to find lower prices on the items you purchase.
Consider your shopping options
If you have always shopped at one grocery store, perhaps you have never looked further than whatever store is closest to your house. Here’s some store categories to investigate when looking for your least expensive food options.
Grocery Chains
This category includes everything from discount grocery stores (e.g. Aldi) to whatever your usual mid-level chains might be to high-end chains like Whole Foods.
I go to Publix, a Florida-based grocery chain, at least once a week. No matter which route you take out of our neighborhood, you will pass a Publix. We have 4 stores within 4 miles of our house, one of which is a mile away and another of which is two miles away from our house. These two locations are on opposite ends of the road that bisects our subdivision. We go to Publix for those items we can only get in a grocery store, to pick up items we ran out of and need now, to get prescriptions filled, etc. They have weekly BOGO (Buy One Get One) free sales, so I may go there to stock up if something we use is on BOGO. Unless I’m getting BOGO deals, we shop with a handheld basket, not a cart, and we are checking out in the 10 items or less line.
I go to Whole Foods every few weeks or so. Whole Foods is about 6 miles from our house, but in a direction we rarely go. This location only opened a year or two ago; before that, the nearest Whole Foods was 15 miles from our house and we never went there. Now we go mostly for specific dietary supplements and gluten-free bread. When we are there, we look to see what’s on sale because, as Amazon Prime members, we get an additional 10% off the sales price (Amazon affiliate link).
Superstores
These are stores like Target and Walmart that have a grocery section in addition to clothing, household items, electronics, and more.
Target and Walmart are both conveniently located for me, across the street (in different directions) from Costco. However, I almost never go to these stores for any reason so have not been making the extra effort to look at their grocery sales.
The Walmart near Costco is a small store, with a limited grocery selection. We do have two other Walmart options — a Neighborhood store, which is Walmart’s groceries-only chain, opened four months ago three miles from our house, and a true Superstore with a full grocery store located five miles from our house in the opposite direction from Costco. The Neighborhood store is smaller than our Publix options, but does have good prices on some things we buy regularly and it is very close. I will be making an effort to get there at least once a month.
Stores specializing in specific regional cuisines
Chris and I like many cuisines from around the world. Large national chains tend to have a limited selection of ingredients from a limited range of brands for a limited range of world cuisines. If you want a full range of ingredients, you are better off shopping at stores that specialize in whatever cuisine you want to make.
Since these stores specialize and primarily cater to people who are making the day-to-day food of their heritage, the turn over on products is better than in the national chains. Not only will the range of ingredients be better, higher turn over means fresher products, and the prices are almost always better than what you find in the national chains.
I just recently started doing regular fruit and vegetable shopping at a local chain called Fancy Fruit and Produce. I buy produce at Costco also, but only things that will last a while or which we use quickly. Almost everything else, I get at Fancy Fruit and Produce. As the name implies, they are a specialty shop for produce. They are also a specialty shop for Latin ingredients and, to a lesser extent, for Asian ingredients. This is reflected in the wide selection of produce — I have not been in any other shop, even the other Latin shops in my area, that sells nopales — but also in their dry goods, meat, refrigerated items, frozen section, and bakery. Fancy Fruit in Produce is 3 miles from my house, on the way home from Costco, so it is an easy place to stop and I go there a couple times a month.
In addition to Fancy Fruit and Produce, I regularly visit specialty shops for Indian and Asian ingredients. I used to visit a Middle Eastern shop also, but it went out of business and I have not yet found a replacement in my area. The best Indian shop in the Orlando area is Patel Brothers, a chain with 52 stores in the eastern part of the United States. Unfortunately, it’s a 45 – 60 minute drive from my house, so I do not go as often as I would like.
The Asian grocery stores are maybe 10 miles from my house and along my driving route to / from my monthly spinning group meeting. Despite this I do not stop very often because I am able to get the majority of the ingredients I need at Publix, Costco, Fancy Fruit and Produce, or online. As a result, I visit the Asian specialty stores once every six months or so.
Warehouse Stores
In the United States, the three largest warehouse chains are Costco, Sam’s Club, and BJ’s. At these stores, you pay an annual membership fee for the privilege of shopping there. Products are all sold in bulk, meaning you must buy a large quantity at a time.
I do the majority of our household shopping at Costco. Yes, we are a two person household. It’s still worth it. I do a major shopping at Costco once every 4-6 weeks, with visits in between to get things we forgot or need to replenish. Costco is only 4 miles from my house, so it is quite convenient to get there. We drive by it regularly on other trips, so can and do stop in for a single item if we need it.
Farmers’ Markets
If you are looking for fresh produce, locally raised eggs or meat, or locally processed foods like jams, your local farmers’ market is a great place to visit. Often the produce was picked that morning or the day before. You get to talk to the farmer. The money you spend on food goes directly to the person who grows it, without middlemen. The combination of price and quality can’t be beat!
In the past I’ve done a lot of shopping at Farmers’ Markets. However, the options that are currently convenient to me are not robust. The majority of the stalls are artisan foods, not people raising produce or animals. As a result, I do not regularly shop at any farmers’ markets.
Online retailers
Many items can be purchased at good prices online, with free shipping if you meet minimum purchase requirements. Several companies offer spices online (my favorite is The Spice House because they sell reasonable sizes for household use, offer free shipping with a minimum order, and have excellent quality products). Walmart, Amazon.com, and Costco (as well as many other retailers) offer a wide variety of products with free delivery once you meet the minimum purchase price.
At Amazon.com, you get a discount off their regular price with “Subscribe and Save,”(Amazon affiliate link) a service that will ship products to you on whatever schedule you choose. This is particularly useful for those products you know you will have to replenish regularly — toilet paper, diapers, cleaning supplies, etc. You can pick a different quantity and schedule for each product. This eliminates two of the common concerns people have with some of these shopping strategies — you do not have to spend time and gas driving to multiple stores and you don’t have to worry about storage space. The concept here is something that many businesses have done for years — Just In Time ordering, to minimize inventory but still get the best possible price.
I currently Subscribe and Save to two items — toilet paper and cleaning solution for our tile cleaner. I get about 15% off Amazon’s regular price on each of these items. The regular price plus discount is less than the regular price at my local shops. I used to Subscribe and Save to the powdered broth mix my mother-in-law used and I had that shipped directly to her. When she passed away, I stopped that subscription. I am currently evaluating Subscribe and Save items to see if it is a good option for any other products we purchase.
Manufacturing facilities
Many food manufacturing facilities have small shops open to the public where they sell products at prices far lower than you will find anywhere else. For many years, the Merita Bread Company baked bread at a factory in Orlando. I used to go there to buy bread for 1/2 the price that it sold for at Walmart, which had the lowest price of any local retailer. Unfortunately, the local factory closed when Hostess bought Merita several years ago. I still miss the smell of fresh-baked bread wafting over I-4 when driving by that factory!
Since Merita Bread Company closed, I am not aware of any other local food manufacturing facilities with shops open to the public. If you’re an Orlando local and know of something, I’d love to hear about it!
Outlets and Liquidators
These stores sell products that may be past their sell by date or that are scratch and dent products. The shopping experience and product quality varies dramatically, depending on the store.
Outlets usually specialize in a specific brand name. The most common outlet stores seem to be those for breads and related baked goods. The selection is usually stable and the physical condition of packaging and product is high.
A liquidator, on the other hand, will have a wider variety of products, but the specific selection will not be the same from one visit to the next. The condition of packaging and product varies significantly from product to product, package to package, and visit to visit.
I used to shop regularly at Sacks, a local liquidator, because it was on my drive home from work. That shop hasn’t been on my way home from work for more than 10 years now. It is perhaps 8 miles from our house, but along a route we almost never take for any other reason. Since it would now require a special trip, I haven’t gone in years.
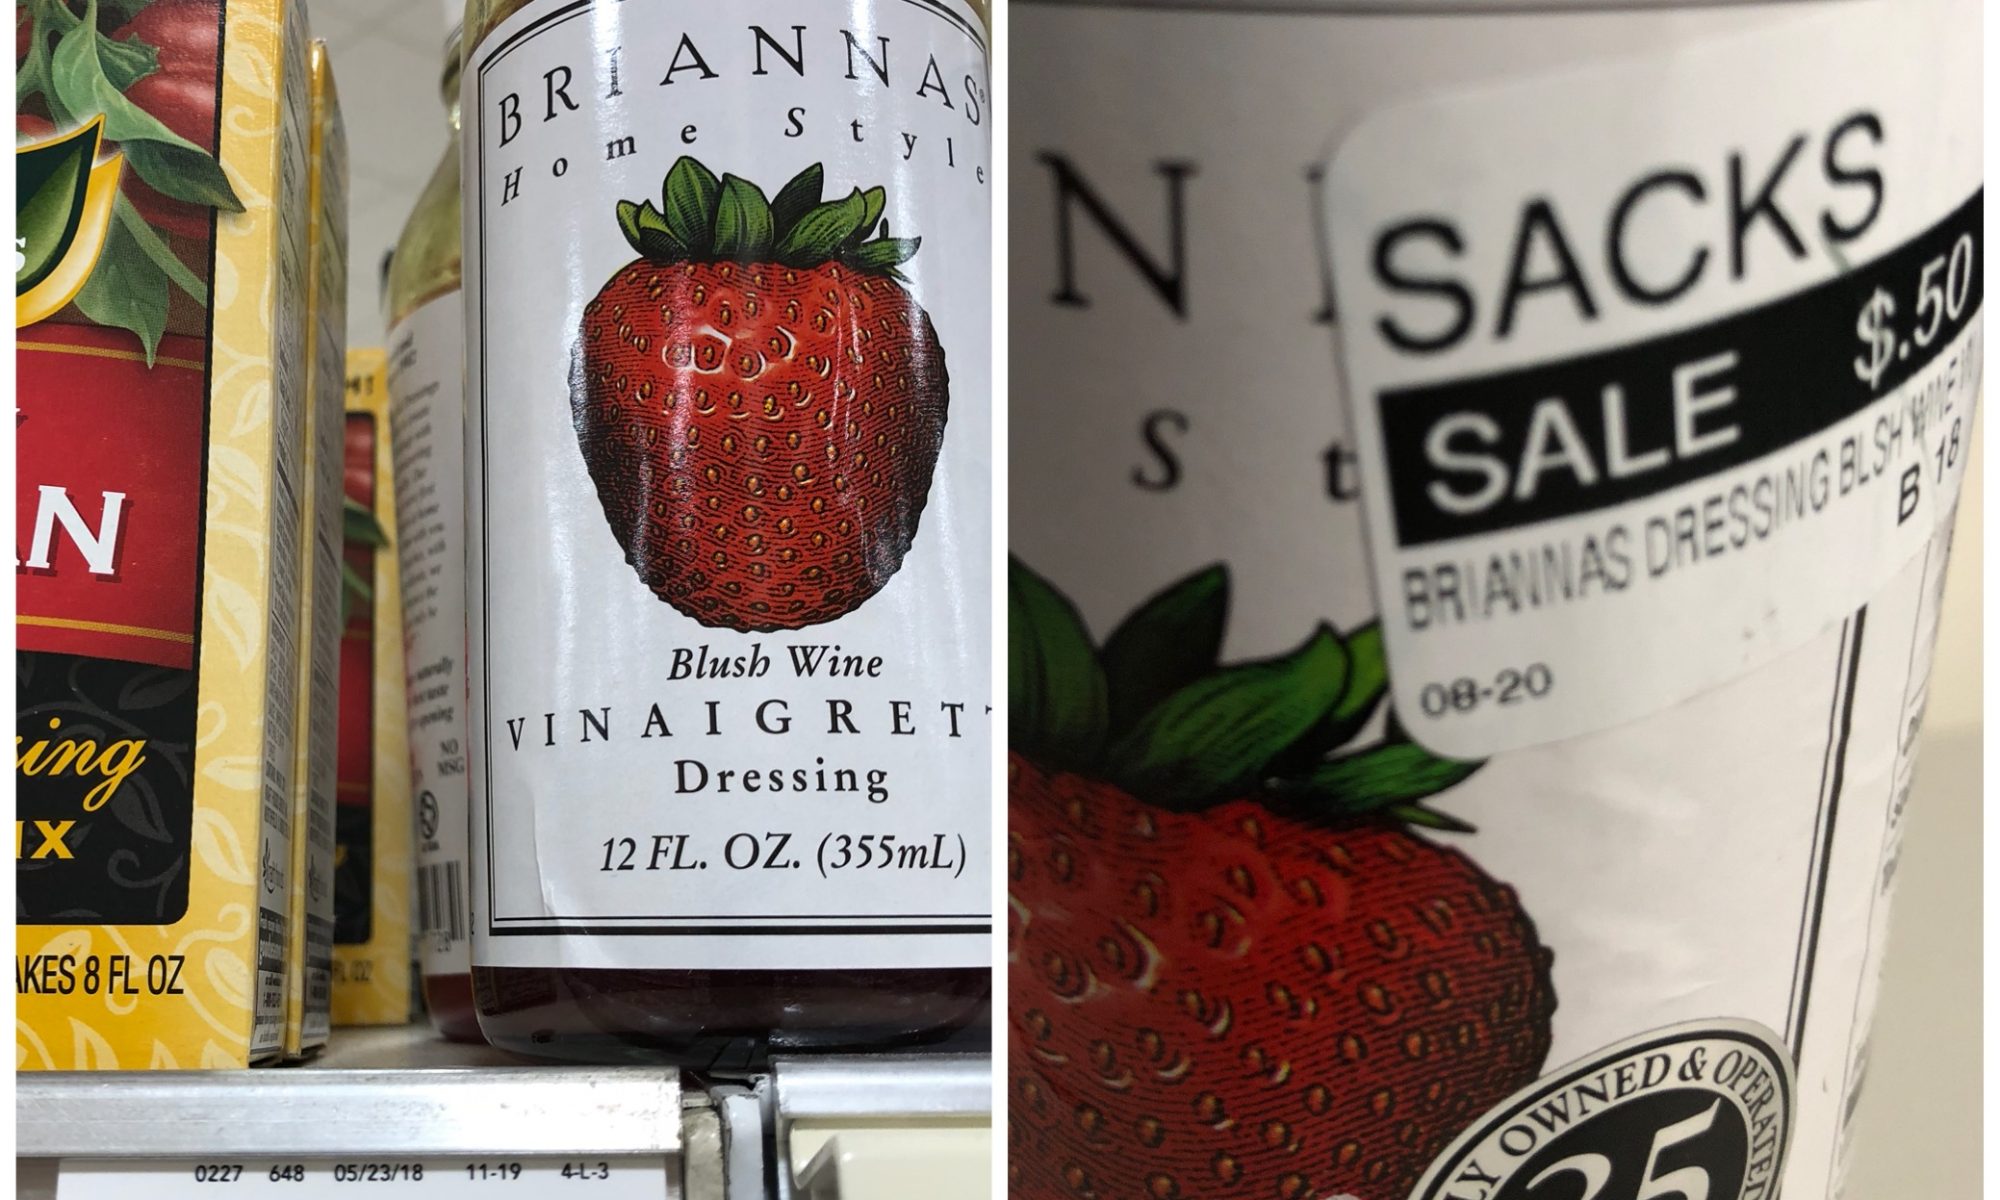
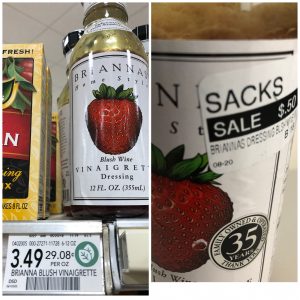
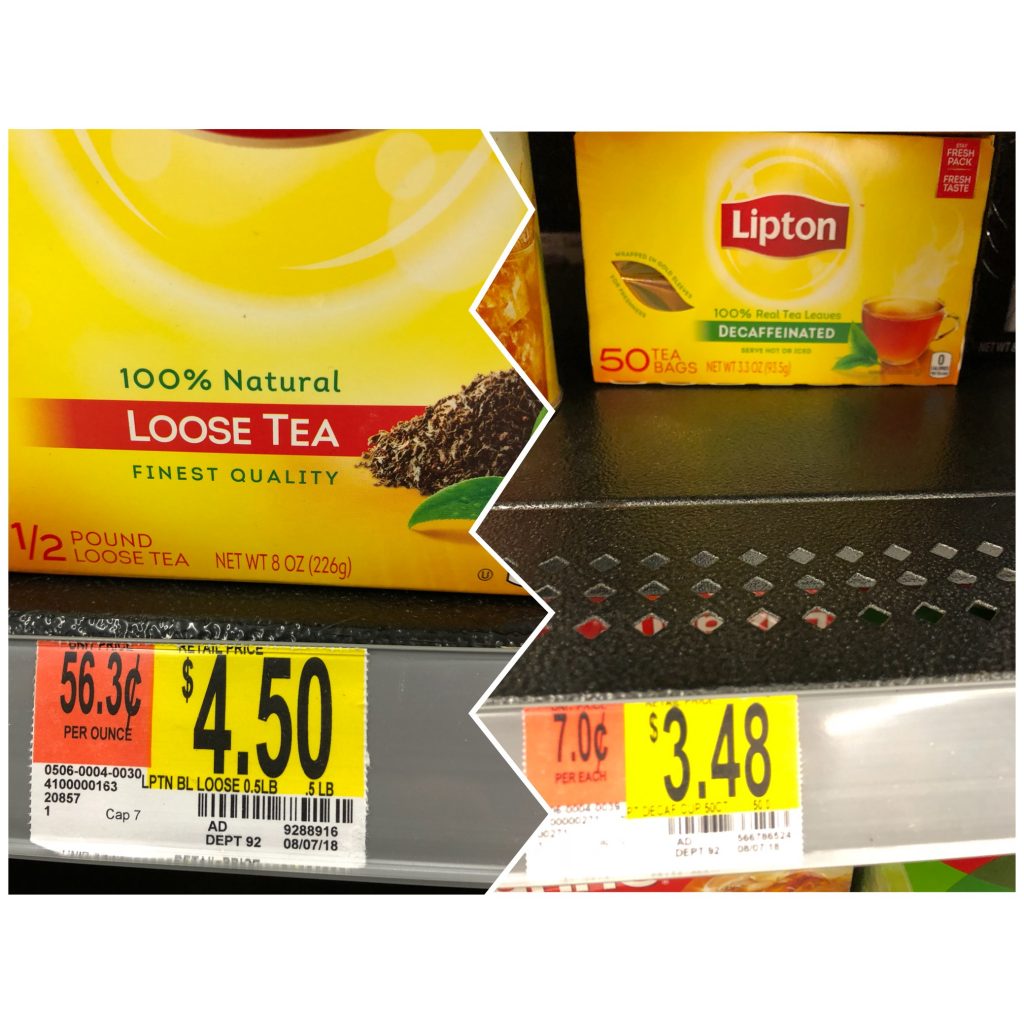
Yesterday, I happened to be driving by the store, so I stopped to see what they had. I remembered both why I used to shop there regularly and why I have not been making a special trip to go there. Despite not visiting the shop for years, I only bought four items — 2 bottles of Brianna’s Blush Wine Vinaigrette and 2 packages of spiralized zucchini. The salad dressing was $0.50 / bottle ($3.50 at Publix) and the zucchini was $1.00 for a 12 oz package ($6 / pound for a similar product at Publix). Obviously, the prices can’t be beat and that’s why I used to shop there regularly.
On the left, the shelf at Publix, taken yesterday. On the right, the bottle I bought at Sacks, with price tag visible.
The reason I have not been making a special trip to go there is that there’s rarely enough quantity of things I buy to make a special trip worthwhile. The nature of this company means that selection will vary — I may never see another bottle of Brianna’s Blush Wine Vinaigrette in their store. Many of their products are ones I will not buy, not just because they are products we do not use, but also because of the condition of the packaging. I have no problem buying the canned or bottled products there, but am wary of anything that comes in a box or bag. I may buy items from the refrigerated section, but am suspicious of the freezer section.
After yesterday’s visit, I think the considerable savings will make shopping there worthwhile. I am thinking that I may start going to Sacks once a month, on days I’m planning to do a larger shopping trip at Costco. Sacks is only 3 miles from Costco so combining the two into one trip improves the time and gas efficiency.
Wholesalers and Distributors
This category refers to the middlemen in our food system. They aren’t manufacturing or raising food. They are acquiring food from growers or manufacturers, then selling to the food industry.
Many of these companies require their customers to have food-related businesses and associated licenses and therefore do not sell to the public. However, some of them will sell to the public. If there’s something you want to buy in large quantities, it is worth the effort to look up your local wholesalers and distributors and give them a call!
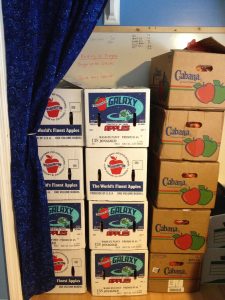
I like to can things. I’ve canned applesauce, marinara sauce, jams, cranberry sauce, peaches, and more. We do not have a garden and do not have easy access to growers for many products. One solution for me is Todd’s Tomatoes, a local produce wholesaler. I’ve purchased both tomatoes and apples from them to turn into sauce, and will be getting tomatoes from them later this year when it gets cool enough that I’m not going to melt when standing outside stirring the marinara.
Cases of apples, purchased at Todd’s Tomatoes, waiting to be turned into sauce.
Common Concerns with Shopping at Multiple Stores
The most common concerns people have with shopping at multiple stores is that it will take too much time to organize food shopping before you go and too much time to visit all these stores and it will cost so much in gas that it isn’t worth it to visit all these stores.
On Time
The penultimate post in this series is about time and calculating the value of the time you spend on all of these strategies, so I’m going to leave a detailed discussion until then. For now, let me just say that, like all the strategies described so far, this one may take some time to set up, but can save time in the long run.
How many stores you visit and how often you visit them is up to you and adaptable to your circumstances. You do not have to go to all of these stores every week or every two weeks or even every month. You may not have all of the listed options available to you.
Regardless of whether these different stores are local to you or if you need to drive a long distance to get to one, you do not need to go out of your way to shop at different stores. Start by researching what is along your usual driving routes to work or school or whatever. Make the easiest changes first and build from there.
On Gas
You can determine how much money you will spend on gas to get to a store and figure out if the purchases you make there save enough money to at least cover your gas. Price per gallon / miles per gallon = price per mile * number of round trip miles to get to the store = how much you’ll spend in gas. Or you can look up the IRS standard mileage rate for business deductions, which is calculated to include the price of all operating costs, including gas, maintenance, and wear and tear. For 2018, the IRS standard mileage rate is $0.545 / mile.
When calculating the vehicle cost of a shopping trip, be sure to only include the mileage specific to that trip. If I combine a trip to Sacks with a trip to Costco, the mileage attributable to Sacks is only the distance between Sacks and Costco, not the distance between Sacks and my house.
Let’s look at the cost of a trip to Sacks, using both calculations. $2.70 / gallon of gas / 25 mph = $0.108 / mile * 6 miles (round trip) = $0.65 (rounded to nearest penny). Using the IRS rate, the marginal rate of adding Sacks to a Costco trip is 6 miles (round trip) * $0.545 =$3.27.
Apply Your Own Value Judgments
The amount saved on the salad dressing, a product I regularly purchase, was a total of $6.00. The amount saved on the zucchini, a product I had not purchased before due to the high cost and which I am unlikely to purchase again in the future, is $10.35. The total savings for the trip is $16.35.
Once you have the data, apply your own value judgments. Which way of calculating the vehicle cost makes the most sense to you? Do you consider the amount saved only on products that you regularly buy? Or would you count the $2.00 spent on the zucchini as a negative because it is money I would not have spent otherwise?
Depending on how you make these value judgments, I saved somewhere between $0.73 ($6 saved on regular price of salad dressing – $3.27 operating cost of vehicle – $2 spent on product I shouldn’t have bought) and $15.70 ($16.35 total savings – $0.65 cost of gas) during my visit to Sacks. Neither of these extremes, nor the intermediate options on the scale between them, are incorrect ways of weighing the data.
Remember our ultimate goal here is food that (1) tastes good and (2) promotes health (3) at the lowest possible cost, with an eye to the (4) time it takes to procure, prepare, and clean-up our food. Each these four points involves value judgments and different people will weigh options differently. What I am trying to do is provide some tools that help you to weigh all your options so you are meeting that goal in the best possible way for your family.
If you’d like to start from the beginning, click here for Part 1 and here for Part 2 in the series. This post contains affiliate links. If you make a qualifying purchase after clicking a link, we may receive a percentage of the purchase price.
I first learned about price books from The Tightwad Gazette by Amy Dacycyzn (Amazon affiliate link). Keeping a price book was a revelation to me and forever changed the way I shop for groceries. Over the years, I have not always kept up my price book. When I first moved to Florida in 2002, I diligently set up a new one to help me learn my new stores. I used it for several years, but when my life got busier I did not maintain it. I just recently started a new one.
What is a price book?
This is a notebook in which you keep track of the price you pay for various products. The focus here is on groceries, but you can use a price book to track any products that you buy on a regular basis.
There are several apps to help you keep this information in your phone, and I wish I could recommend one of them. When I was starting my new price book, I tried at least 1/2 dozen apps. They were all too fiddly for me, took longer to set up than the equivalent paper book, and did not function in a meaningful way after the products were set up. If you do find an app you like, I’d love to hear about it!
Why keep a price book?
When we calculated the unit pricing on items, we figured out the best available price in that store at that moment. The price book helps us to know the best available price across time and space (I desperately want a TARDIS-like acronym or pun here, but I’m not coming up with anything I love. Please share suggestions in the comments!)
The price book gives us a convenient way to figure out which stores have the best prices on an item. It helps us recognize how often items go on sale so we can, to the extent our storage allows, purchase enough of an item to last to the next sale. If we check our price book, we immediately know if an advertised sale is, in fact a good deal.
How do you set up a price book?
Pick a Notebook
A price book does not have to be fancy. You do not need to buy something special. It can be any notebook hanging around the house. I do recommend that you use something that is convenient for you to bring with you when shopping, so choose a size that is easy to carry or that you can slip into your purse.
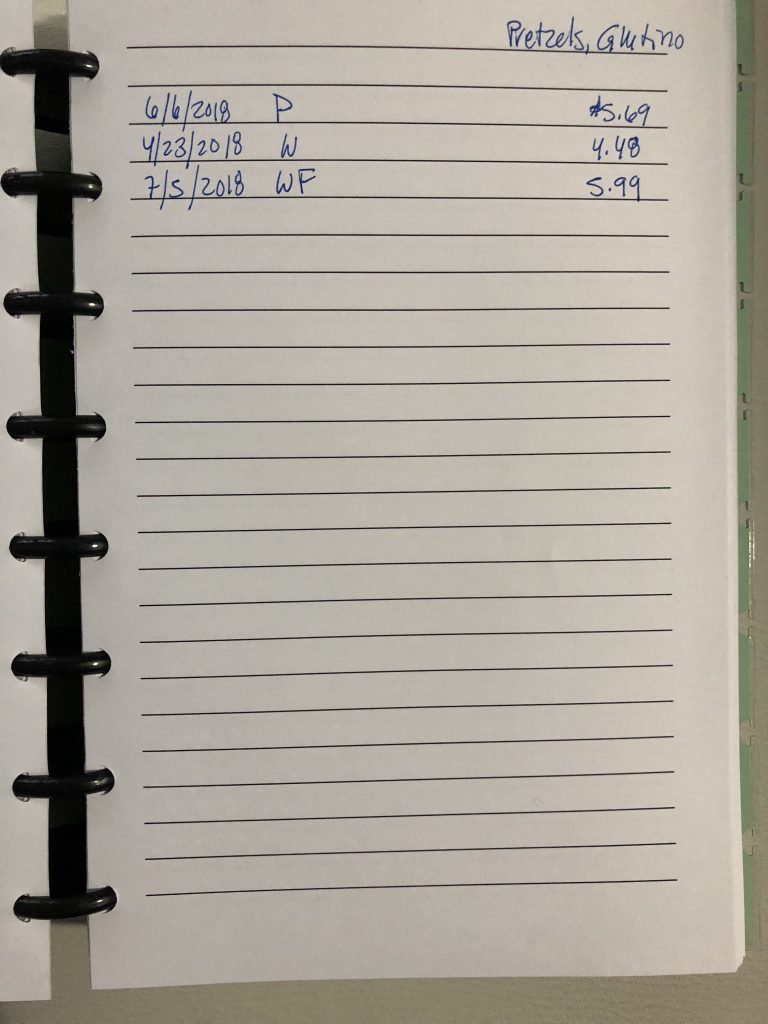
The price book I put together when I first moved to Florida was a 5x8x1 three-ring binder. I dismantled that one long ago. I think I gave away the binder some time ago and I did not have any small notebooks around the house. However, I did have the pieces to make a small notebook, using Levenger’s Circa system.
I printed my own 5.5×8.5 lined paper. Usually you can find templates for this on the internet, but I did not find one I liked, so I made my own in word processing software. I made two columns on a standard 8.5 x 11, tabbed two pages worth of underlining, then printed double sided. After printing, I cut the sheets in half with my scrapbooking paper cutter. I punched the sheets with the Levenger Circa paper punch that I got free when someone was getting rid of it many years ago. For the covers, I used card stock I had laying around the house and I laminated the card stock with my Amazon Basics Laminator (Amazon affiliate link), which I got during a Black Friday sale a couple years ago and absolutely love!
Note that both of the options I chose allow you to add and remove pages. I like this feature in a price book because I like to keep products in alphabetical order. If I start tracking a new item, I can easily add a page in the correct place, an option not available if you use a bound notebook. I use one sheet per product that I am tracking, both because it’s easier to keep products in alphabetical order and because a single sheet will last for multiple years of price tracking.
Think About What Products to Track
You do not have to track every single product you buy. The two primary factors are (1) the impact of product pricing on your personal bottom line, which includes how often the product goes on sale and how often you personally buy it; and (2) grouping products in order to make true comparisons.
Your Personal Bottom Line
One purpose of a price book is to learn how often and when products go on sale, so you can stock up on that item. If you are going to stock up on an item, it needs to be something you use regularly enough that it won’t go bad in storage before you use all of it. If you are just going to throw something away in a few weeks or months, you have not saved any money. Items that you will buy in quantity should definitely be in the price book.
Items that you will never buy in quantity might not need to be in the price book. You could just check the unit pricing each time you buy it. You might also decide to include these items in the price book so that you can do an initial comparison of your various options and find the least expensive option. You could then do spot check comparisons every so often to make sure the option you chose is still your least expensive option.
My personal rule of thumb is that the frequency of purchase needs to be at least every six months for inclusion in the price book to be worthwhile. The longer the interval, the less likely it is that today’s pricing information will be relevant the next time you buy the item. I can still comparison shop and look at the lowest unit prices available to me at the time of purchase, but I probably do not need to put infrequently purchased items in my price book.
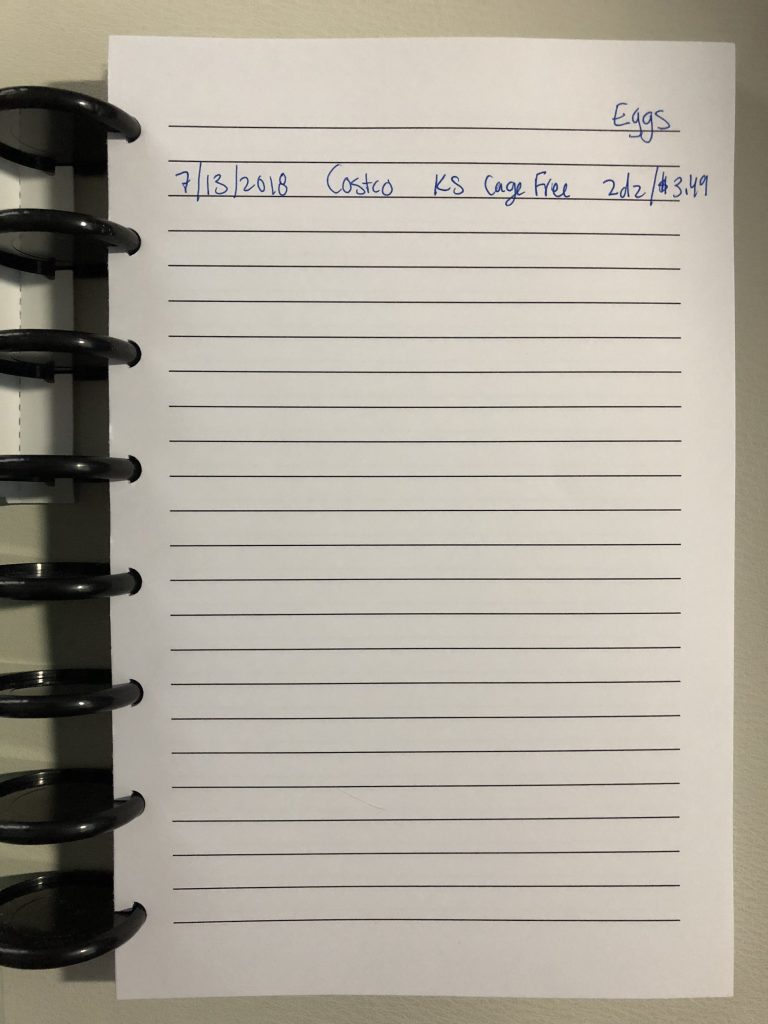
Grouping Like Items for Tracking
When deciding which items to track, you may decide that it is best for you to group items together for tracking purposes. You probably do not need a single sheet for a particular name brand of most products. The goal here is comparison shopping, which includes across brands. You’re most likely going to have a page labeled “Salsa,” not individual pages for “Pace Salsa,” “Tostitos Salsa,” etc.
But if you only ever buy one brand, size, and version, maybe you will put the brand name on the sheet. Customize your book to reflect your own needs!
Since I am a vegetarian, I eat a lot of beans with grains and vegetables. Do I really need to track every single variety of bean (black beans, kidney beans, red lentils, brown lentils, chick peas, channa dal, navy beans, etc, etc) that I routinely stock in my pantry? Do I need to track dried beans and canned beans separately? Maybe, but probably not. Think about how your family eats and group products that you use interchangeably, so you can make true comparisons.
Decide Which Data to Track
In my price book, each purchase of a product has one line, with the following information:
Date purchased
Store where purchase was made
Brand name of product
Units in product
Total price paid
Notes on pricing, like if it was a sale, what kind of sale, and if I used a coupon
In my view, these are the minimum pieces of data that you need to track. You may also want to write down your unit pricing, in addition to or instead of the Units in Product and Total Price Paid. Doing so means you will not have to calculate unit pricing at that price / units combination ever again!
If you find yourself abbreviating the store or brand names, you might want to make a note, either on a page at the front of your price book or on the particular product page, so you remember what the abbreviation means!
Collect Price Information
You have three main options for collecting your initial price information when you set up the price book: (1) Use recent grocery receipts; (2) Go to the store(s) you shop at, price book in hand, and walk the aisles making notes; (3) Build your price book organically over time, either by bringing your book to the store with you and making notes while you shop or by making notes in your book immediately after returning from your shopping trip. The fastest way to build your price book is probably a combination of these three methods.
I am still working on collecting price information for my current price book. When I made the book, I immediately used the first option and I have been using the second option to continue building the book. The major disadvantage of option 1 is that grocery receipts do not include the units for the products you purchase. If it’s been some time since your date of purchase, you may not remember the units and you may have used the product and thrown away its packaging.
When I set up my price book when I first moved to Florida, I used option 2. The disadvantage of this option is that your behavior is not that of a normal shopper and you may get stopped by an employee. I visited several stores and was only approached by one employee asking what I was doing. When I explained, they seemed unconcerned, but I did stop and leave the store shortly thereafter. YMMV.
Using your price book
Once your price book is set up, regularly record the prices of your purchases. You can refer to the price book when meal planning or making a list before you go to the store. When you are in the store, you can refer to the price book to see if the price on a product is really a good deal.
After a while, you will find that you have a good idea of the lowest price you are able to find for regularly-purchased products and how often they go on sale. Once you get to that point, you may decide that you do not need to update every product every time you go shopping. You might narrow your regular tracking to your most recently used items and items that change price frequently.
You will find that some products that never go on sale — many staple items rarely do. Once you know about what you usually pay for those items maybe you only check the prices on them every six months or once a year, to make sure you are still getting the best available price.
A price book is a tool to help you make smart decisions. Putting these details on paper provides you with data that you can rely upon in the future and frees up your active memory and decision-making functions for higher level tasks. Since it is your tool, you can adapt it in whatever way makes the most sense for your life and the types of food and shopping choices you need to make!
Click here for Part 1 in this series. This post contains affiliate links. If you make a qualifying purchase after clicking a link, we may receive a percentage of the purchase price.
My mother always took us grocery shopping when we were small. By the time I was 8, she would say she either needed to bring a calculator or me. I would keep a running tally of everything in the basket in my head and I would calculate unit pricing, also in my head, whenever she needed, without losing track of the running tally. I like math 🙂
An Overview of Unit Pricing
Unit pricing is the single most important piece of information you need in order to truly comparison shop. Is the 40 oz jar of peanut butter a better deal than the 16 oz jar of peanut butter? The only way to know is to know the unit pricing.
To find the unit pricing, you divide the price of the product by the number of units in the product in order to find the price of a single unit. In the peanut butter example, let’s say the 40 oz jar of peanut butter is $7.50 and the 16 oz jar of peanut butter is $3.00. Which one is a better deal? $7.50 / 40 = $0.19 / oz. $2.75 / 16 = $0.17 / oz. The smaller jar of peanut butter is the better deal. (I made up prices; the real price on Amazon is much better than this, if you are an Amazon Prime member. The ad below is an affiliate link.)
Two things make unit pricing easier today than it was when I was a child. First, 18 states plus the US Virgin Islands, Puerto Rico, and the District of Columbia now have labeling laws that require the price posted on the shelf to include unit pricing.
Florida requires unit pricing on shelf tags. In this case, the price per ounce is in the orange box. The units appear below the price.
Major online realtors, including Walmart and Amazon, have unit pricing listed on the food items for sale on their site. If you are lucky enough to live somewhere with unit pricing on the shelves, you don’t need to calculate it yourself.
Second, if you’re carrying around a smart phone, you have a calculator on you at all times. There’s no need to remember a calculator or to do the math in your head. You’ve got an app for that!
When do You Need to Calculate Unit Pricing?
If you live somewhere that does not include unit pricing on the shelf labels, you have no choice. If you want to know the unit pricing, you must calculate it yourself. Even if you live somewhere that has unit pricing on the shelves, there are times when you will need to calculate the unit pricing yourself.
What is a Unit?
In the peanut butter example, I used the number of ounces in the jars as the unit. Weight and volume are the most logical units to use for many, but not all products. Do I care how much my paper towels weigh? Not at all. How many sheets do they have? Or how many square feet? These units make more sense.
The unit price on the shelf may be calculated using a unit that does not make sense to you personally. Maybe you want to buy a certain number of servings of fruit and you want to compare the price per serving of apples and grapes. You would need to figure out how much a single serving costs in order to compare. A serving of grapes might be 1 ounce, but you may count a whole apple as a serving regardless of its weight. Or maybe the paper towels are labeled per square feet and that seems like nonsense to you because you’re going to take a sheet at a time, whether you are using a smaller select-a-size sheet or full size sheet. If this is your situation, you will have to calculate the unit price yourself.
Similar products may be labeled in an inconsistent manner. As in the photo below, tea might be labeled by the number of tea bags in the box (right) or the weight of the product (left). In the photo, the price alone might make you think the loose tea is much more expensive. However, if you convert the tea bags to a per ounce unit pricing, you see that the tea bags are the more expensive option ($3.48 / 3.3 ounces in the box = $1.05 / ounce).
In order to compare inconsistently labeled products, you will need to calculate unit pricing based on the same unit for all of your options. Choose the unit that makes the most sense for how you use the product and do the math!
Sales and Coupons
Sales flyers never have unit pricing in them, so if you are looking at sales flyers before you go to the store, you may want to calculate unit pricing as part of your planning process. Once in the store, the signs with sale prices do not always include unit pricing to reflect the sales price. If you have a coupon, you will need to subtract the coupon from the advertised price before dividing: (Price – Coupon) / Units.
A Preview of Things to Come
The next four columns in this series will all relate to and rely upon the idea of unit pricing. The bottom line is you need to be able to make a true comparison of the cost of the products you buy and the best way to do that is the unit pricing. Since you have a calculator in your pocket or purse, it isn’t hard to calculate unit pricing. It may take a little time to calculate when you first start doing it, but some of the strategies coming up will reduce how often you need to make the calculation. Stay tuned!
This post contains affiliate links. If you make a qualifying purchase after clicking a link, we may receive a percentage of the purchase price.
Over the years, I have waxed and waned in my practice of the various strategies I’ve learned regarding saving money on groceries. When I have money, but not much time, I don’t maximize these strategies. When I have both time and money, I don’t maximize these strategies. When I have time, but not much money, I must maximize these strategies. At the moment, I find myself in the latter category, and so I am reminding myself of the things I already knew. I thought I would share these things with you, to adopt or not, if it works for you.
Why Focus on Food?
This poster is World War I-era propaganda, aimed at those who were at home, rather than in the battlefield. Governments across the world encouraged their citizens to economize in many areas, as a way of supporting the war effort.
If you are looking to save money in your overall budget, victory starts in the kitchen. Food is the third largest household expenditure in the United States.
Housing and Transportation costs may be reduced, but they tend to be sunk costs. If you own a home, it will take time to sell and buy or rent a less expensive place. If you rent, the penalties incurred in breaking a lease may be more than you would pay to stay through the end of the lease. Reducing transportation costs might mean moving closer to work, buying a new vehicle, or figuring out ride sharing options. Since Housing and Transportation are sunk costs, it may take weeks or months to work out lower-cost options.
In the chart above, the amount spent on food includes both dining out and food at home (groceries), which includes purchase of both raw ingredients and prepared foods. This chart breaks the food budget down into the types of food purchased, based on the level of employment in a household.
Households where all adults were employed spent about half of their food budgets at restaurants, whereas households where a primary shopper was unemployed spend only 36 percent. Households where all adults were employed spent 10 percentage points less of their food budgets on non-ready-to-eat foods compared to households where a primary shopper was not employed. The statistics for this chart are from the ERS report Consumers Balance Time and Money in Purchasing Convenience Foods, released on June 27, 2018.
This chart demonstrates why it makes sense to start with food if you want to reduce your budget. You have multiple options for food: eating out, purchasing prepared foods, or purchasing raw ingredients and preparing food yourself. Since food is perishable, you make a daily decision on what to eat. Therefore, the financial impact of changing your food decisions can be seen in a matter of days.
What’s coming in this series
The strategies discussed focus on grocery shopping for raw ingredients. This is almost always the least expensive way to eat. However, the overall goal is food that (1) tastes good and (2) promotes health (3) at the lowest possible cost, with an eye to the (4) time it takes to prepare food and clean-up afterwards. The least expensive option possible is not always going to meet the first two goals and is likely to increase the time spent on cooking and cleaning up.
Almost everything I know about saving money on groceries, I learned from either my mother or The Tightwad Gazette by Amy Dacyczyn (Amazon affiliate link). When I was growing up, our family did not have much money. My mother kept a strict grocery budget and usually took her children with her when she shopped. We learned many shopping lessons by osmosis!
I lived with my parents until I married my first husband, six weeks shy of my twenty-second birthday. We did not have much money either, so I was always looking for ways to save money. It was at this time that I found The Tightwad Gazette, which taught me systemization in a way that my mother had not.
The strategies I learned from my mother and from The Tightwad Gazette will help you determine the lowest cost of any food items you wish to purchase. It’s up to you to weigh the monetary costs against the taste, health, and time factors impacting your life.
In my post last week, I told several stories about the Greenes and food. All those stories were extraordinary food experiences. Like in every household the day-to-day and the celebratory aren’t quite the same thing. We are a household of two and the two of us have such different food requirements that we rarely eat the same food as each other at any given meal.
I am a lifelong, born and raised, lacto-ovo vegetarian. Lacto = milk and ovo = eggs. This means I eat animal products including all dairy, eggs, and honey, but I do not eat any actual animals. I do not eat any poultry, pork, beef, lamb, seafood, or insects.
Chris, on the other hand, is a dedicated carnivore, though he rarely eats any meat other than poultry. He eats very little dairy and limits (but does not entirely exclude) how much gluten he eats.
Due to our disparate food choices, in the many years we’ve been together, I have rarely cooked dinner for both of us to sit down and eat that meal. Instead, I tend to cook for the freezer. I will cook a meal for one or the other of us, package and label it, and put it into the freezer. I will often spend a day or afternoon cooking multiple meals and filling the freezer. When we want to eat, we either take one of my homemade dinners out of the freezer and heat it up, or we make ourselves a quick meal, like a sandwich.
This is a fairly empty freezer for us! The freezer is a 14 cubic foot freestanding model. Our refrigerator is an 18 cubic foot unit with no built-in freezer.
The combination of our unusual daily needs and our history of regular entertaining impacts the way we approach shopping for food. Over the years I’ve developed a significant pantry. I’m usually shopping to replenish the pantry or for fresh foods. We shop at Costco rather more than might be expected from a two-person household. We go to the local grocery store only for a very few items, most of which aren’t available at Costco in a quantity that we can reasonably use. Since we love foods from a wide variety of cuisines, I also visit stores that carry specialty ingredients of those cuisines, as needed. I order spices online because I can get a wider variety, at a better price, and excellent quality than from any one local source.
I strongly believe that cooking from scratch is the least expensive option overall, that the quality of homemade food is better than prepared foods, that homemade food is more delicious than prepared foods, and that meeting our dietary requirements is easier when cooking at home than when we purchase foods prepared either at a restaurant or at the grocery store. Due to the craziness of our lives over the last several years, I’ve been cooking less than I’d like. Getting back to cooking more is one of our highest priorities.
Over the next several weeks, I will be writing a series of posts going into more detail on our approach to food. I’ll reveal the details of our pantry, share what we’re cooking, and talk about the cost of food. I plan to publish these posts weekly, on Mondays. Stay tuned!