

For the previous posts in this series click Part 1, Part 2, Part 3, Part 4, Part 5 and Part 6a. This post contains affiliate links. If you make a qualifying purchase after clicking a link, we may receive a percentage of the purchase price.
Yesterday, we talked about calculating the cost of ingredients and setting up a spreadsheet. Today, it’s time to put a recipe into the spreadsheet so we can figure out how much it cost, then compare that cost to the store bought product it is meant to replace.
About the Recipes
The recipe I’m using for comparison is Yeast-Raised Waffles from the book Gluten-Free on a Shoestring Bakes Bread by Nicole Hunn (Amazon affiliate link). This particular recipe is not available on the Gluten-Free on a Shoestring blog. The spreadsheet screenshots in this post do not include two of the ingredients in the recipe — yeast and salt. I purchase those ingredients very infrequently and in bulk at Costco. At the quantities in this recipe, the two together add less than $0.05, so omitting them on the spreadsheet does not appreciably impact the overall analysis.
Nicole Hunn developed her own gluten-free flour blends and all of her other recipes use one of her own blends. The recipes for the blends are available on her blog. The ingredients and quantities included on the spreadsheet for the two flour blends are the complete list.
Add a Recipe
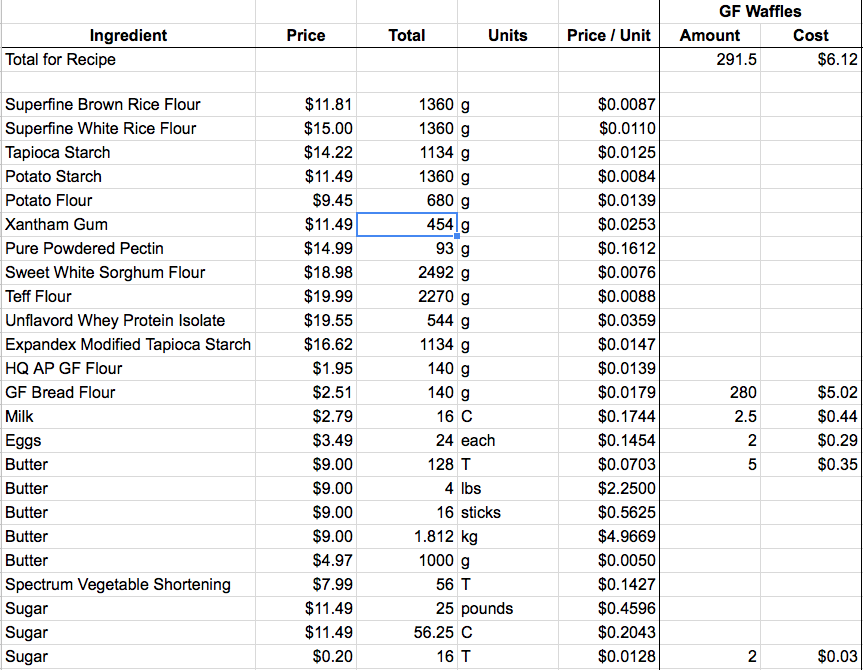
Once the ingredients are in the spreadsheet, adding a recipe is pretty quick. You need two columns for the recipe. The column labeled ‘Amount’ is the quantity of the particular ingredient in the recipe. The column labeled ‘Cost’ is a formula.
Amount
This column is a manually entered static number. I open up the recipe book and go down the list, adding the quantity of ingredients. When you have ingredients with multiple entries (both butter and sugar in the waffle recipe), make sure you are entering the quantity on the line that matches the units in this particular recipe.
Price
The formula contains two cell addresses, multiplied together. The first cell reference is to the Price / Unit cell for that row. The second cell reference is the Amount cell for that row. (Price / Unit) * Amount. For sugar, the actual entry in the Cost cell is: =E28*R28. E28 is the cost of 1 tablespoon of sugar. R28 is the number of tablespoons of sugar (2) in this recipe.
Total Per Recipe
Finally, we need to calculate the total cost of the recipe. You can see that I put this information at the top of the column instead the bottom of the column. I did that because the spreadsheet will eventually have a long list of ingredients and I didn’t want to have to scroll all the way to the bottom to see the Total.
The formula in the Cost column is a sum of the column. The entry is =Sum(S5:S300). The reason I went all the way down 300 rows is because I don’t know how many ingredients will end up being in the spreadsheet and when I reorganize into alphabetical order, I don’t know how far down the ingredients in this recipe will be. I don’t want to break my formulas if I don’t have to, so I put in a number that it is much higher than the number of ingredients I expect will be listed in this spreadsheet.
I’ve calculated the total for both the Amount column and the Cost column. There’s really no reason for that and the number in the Amount column is not useful because ingredients are measured with two different measuring systems (butter and sugar by volume and everything else by metric weight).
Compare Your Recipe Cost to the Cost of Prepared Food
In order to make the financial comparison, you must make an honest comparison with the food the homemade version is meant to replace. If you might buy any of several different brands, you should compare your homemade version to the lowest cost prepared food you would otherwise buy. The trickiest part of the homemade to prepared food comparison is making sure you compare equal quantities of the foods, whether that is serving sizes or weight.
In the case of the gluten-free waffles I’m using for illustration purposes, our comparison product is Vans Original Gluten-Free Waffles (not an affiliate link. This link to Van’s website is provided because they have the nutritional label and that may be useful for comparison purposes as you read).
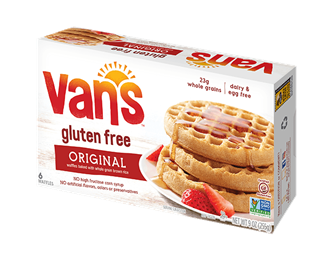
When Chris decided to reduce the amount of gluten he was eating, waffles was his first major concern. He loves waffles with eggs and bacon for breakfast and, often, for dinner. He tried a couple different brands and Vans were his favorite, so that is what we have been buying. We can get them at either Publix or Whole Foods and the price is the same in both places: $5.50 per box of 6 waffles. He eats one waffle per meal.
It cost $6.12 to make the Gluten-Free Waffle recipe. At first glance, it looks like the Vans are less expensive than homemade, but is that true? In order to know for sure, we have to look at how many servings the homemade recipe makes.

This is what one waffle looks like, just out of our waffle maker. The Gluten Free Waffle recipe made 7 full waffles plus 3 additional hearts. After I make waffles, I break up the big waffles into individual hearts. I line a cookie sheet with wax paper and put the hearts onto the sheet. I usually need multiple layers and I separate them with more wax paper. I then put the entire cookie sheet into the freezer.

When the waffles are frozen, I take the cookie sheet out of the freezer and transfer the waffles to a gallon-size Ziploc bag, which I label with the date I made the waffles. The reason I freeze them in this fashion is because the individual hearts do not stick together in the Ziploc bag if you put them in there already frozen. You can take out as many as you want to eat and pop them into the toaster oven to reheat them.
Since this was the first time I made this particular recipe, I weighed one of the big waffles and compared it to the box of Vans. The 7 big waffles were the equivalent of 15 individual Vans waffles, so 2.5 boxes worth. That means that, by weight of products it would cost $13.75 to buy the same amount of waffles that I made for $6.12.
I’m not sure weight is the best comparison in this instance, however. By weight, it takes 2.5 homemade heart waffles to equal 1 Vans waffle. We all know Chris is not going to eat 2.5 heart waffles at a time. He’s going to eat 2 or he’s going to eat 3. The recipe made a total of 38 hearts (7 big waffles * 5 hearts per big waffle + 3 extras). That works out to 13 servings or 2 boxes plus one Vans waffles. By likely serving size, we would pay $11.92 to buy the same amount of waffles that I made for $6.12.
In this case, it is clear that no matter how I measure, making the waffles is less expensive than purchasing the Vans waffles. Of course, our goal isn’t just the lowest cost. It is food that (1) tastes good and (2) promotes health (3) at the lowest possible cost, with an eye to the (4) time it takes to procure, prepare, and clean-up our food. Therefore, I think it’s important to note that Chris liked the taste of the homemade waffles at least as well, if not better, than the Vans!
Up Next
In this series so far, I’ve presented several tools and strategies that I learned when I was a young newlywed with little money to spend on anything. All of these strategies can save us money, but using them requires another precious resource: Time. How do we account for the time it takes to use these various strategies? Does the time involved mean there’s no point to using these strategies? Tomorrow, I’m finally going to write about time and introduce you to another resource that I first encountered at the same time that I found The Tightwad Gazette (Amazon affiliate link).
Click here for Part 6c: Calculating the Cost of Homemade: Where to Start with Cooking.